Table of Contents
The is a competition focused on training 1 LLM for 24 hours on 1 GPU — the team with the best LLM gets to present their results at NeurIPS 2023.
Large language models like GPT-4 have impressive capabilities. However, they are expensive to develop and run, and there is a lot of demand for custom large language models, as well:
personal assistants for writing drafts (many researchers and companies cannot post sensitive materials into ChatGPT);
Question-and-answer systems for legal, medical, or financial data and documents;
Customer chatbots that have domain knowledge in a specific field or with respect to a company’s products.
Applications aside, for researchers like me, this challenge is a very exciting opportunity to develop and try new methods to train LLMs more efficiently.
But before we jump to the hands-on sections, let’s review some key points and restrictions for a brief overview. However, participants should check out the for all up-to-date details.
The official challenge website is hosted at https://llm-efficiency-challenge.github.io
This section covers the NeurIPS 2023 Efficiency Challenge in brief. (I highly recommend also checking out the for all up-to-date details.)
GPUs
Since only 1 GPU is allowed, this challenge is a nice testbed for experimenting with efficient finetuning techniques without worrying too much about the infrastructure. Only the following two Nvidia GPUs are allowed:
A100 (40 GB RAM);
and RTX 4090 (24 GB RAM).
(Since these GPUs are not directly comparable, there are two different tracks and leaderboards.)
Models
All three transformer LLM architecture types are allowed: encoders, encoder-decoders, and decoders. (What’s the difference between encoders and decoders? I discussed it .)
However, I speculate that decoder-only architectures may be the most promising direction:
“We explored this question in Wang et al. (2022a) where we evaluated encoder-decoder and decoder-only architectures and their interactions with causal, prefix, and masked language modeling pretraining objectives. Our results show that immediately after pretraining, causal decoder-only models performed best – validating the choice of state-of-the-art LLMs.” — Citation from
The list of approved LLMs is summarized in the figure below. Note that the competition is focused on base (foundation) LLMs that are not finetuned (yet) since finetuning is the focus of this competition.
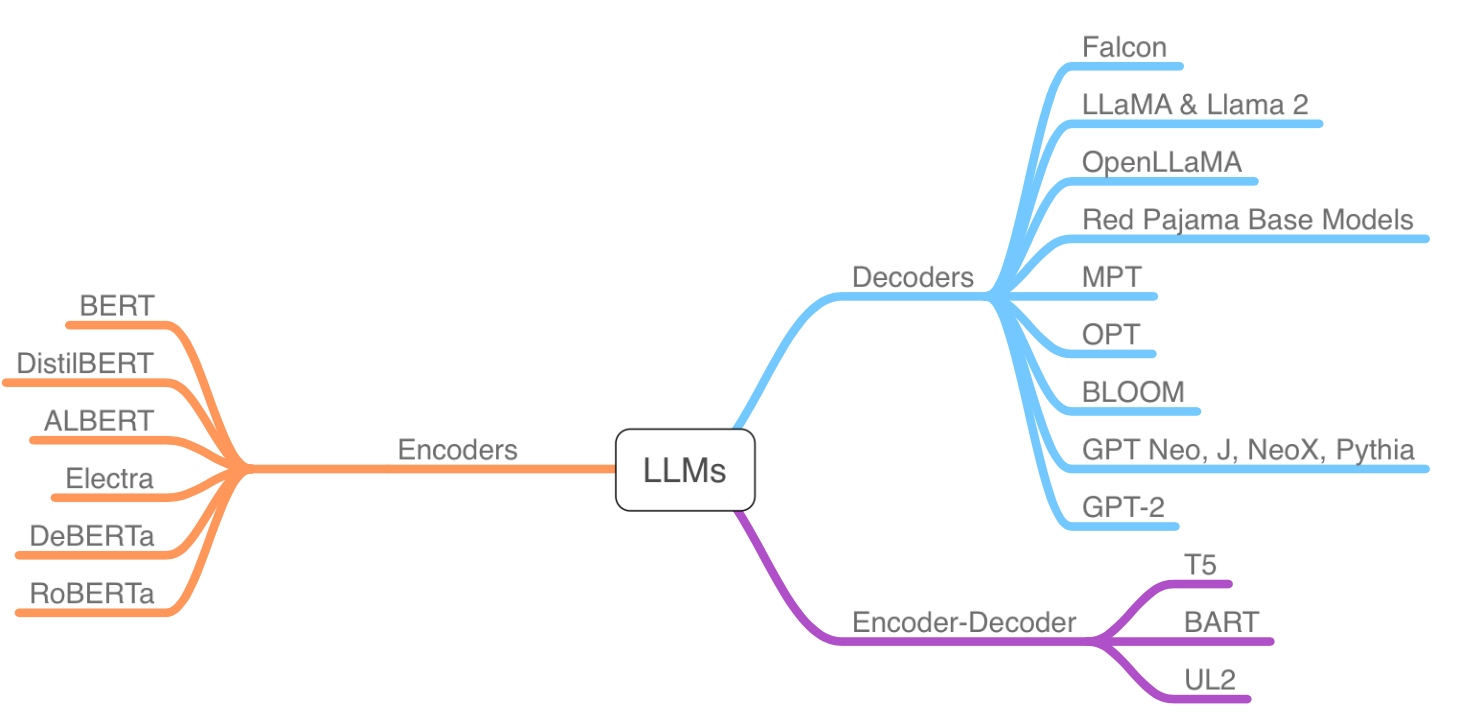
Models that are permitted in the competition (as of this writing)
Data and Tasks
When choosing a dataset, note that models are not expected to handle contexts with more than 2048 tokens. The evaluation, a subset of Stanford’s benchmark suite, will be on English texts. (We will run the HELM benchmark at the end of this article.)
Participants submit the training and evaluation codes, which should contain all the necessary steps to train the base model for up to 24 h on an A100 or RTX 4090 on an “open source” dataset. As of this writing, the following datasets were permitted:
(15k instruction-response pairs)
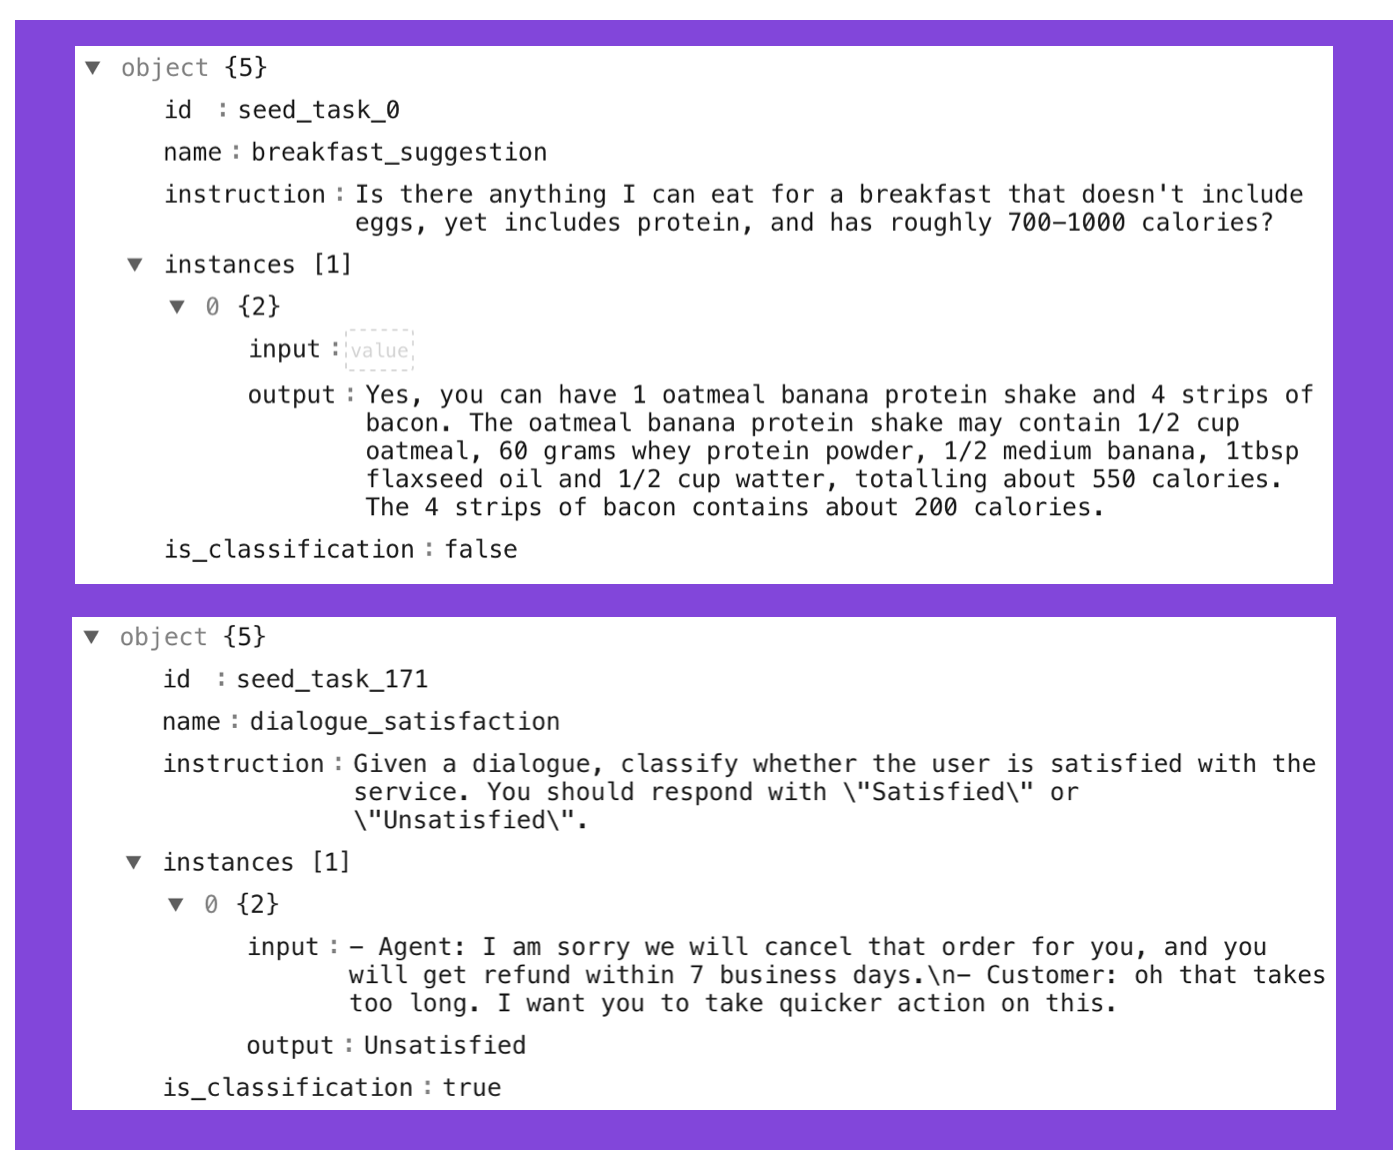
Two examples from the Alpaca-Libre dataset.
The Official Starter Kit
The NeurIPS efficiency challenge organizers selected the repository as the official starter kit, an open-source GitHub repository that implements methods and tools for loading popular LLMs (see table below). This comes in handy since I have some experience with this repository due to some contributions in the past, including implementing LLaMA-Adapter v2, full finetuning, a port of low-rank adaptation (LoRA), collaboration on implementing QLoRA, and more.
What’s also nice is that Lit-GPT implements the currently most relevant LLMs for this competition, as summarized in the table below:
| Reference | |
|---|---|
| Meta AI Llama 2 | |
| Stability AI FreeWilly2 | |
| TII UAE Falcon | |
| OpenLM Research OpenLLaMA | |
| LMSYS Vicuna | |
| Together RedPajama-INCITE | |
| EleutherAI Pythia | |
| StabilityAI StableLM |
In the following sections, I will walk you through setting up a computing environment and the Lit-GPT repository for experimentation and submission!
Note that it’s not required to use this Lit-GPT starter kit that the organizers suggested. Also, note that the organizers are not affiliated with the repository or its developers but chose it independently, which is likely because it’s relatively customizable and “hackable,” which comes in handy when trying new research ideas.
4 – Setting Up a Project Environment
Personally, I prefer creating a dedicated virtual environment for each research project that I am working on, which helps me manage specific version numbers and so forth. For this, I (still) prefer using the . In this section, I will walk you through the process of how I like to set this up. (If you are already comfortable using conda, venv, or any other virtual environment setup, you can skip this section.)
On the machine where you plan to run the experiments, download or
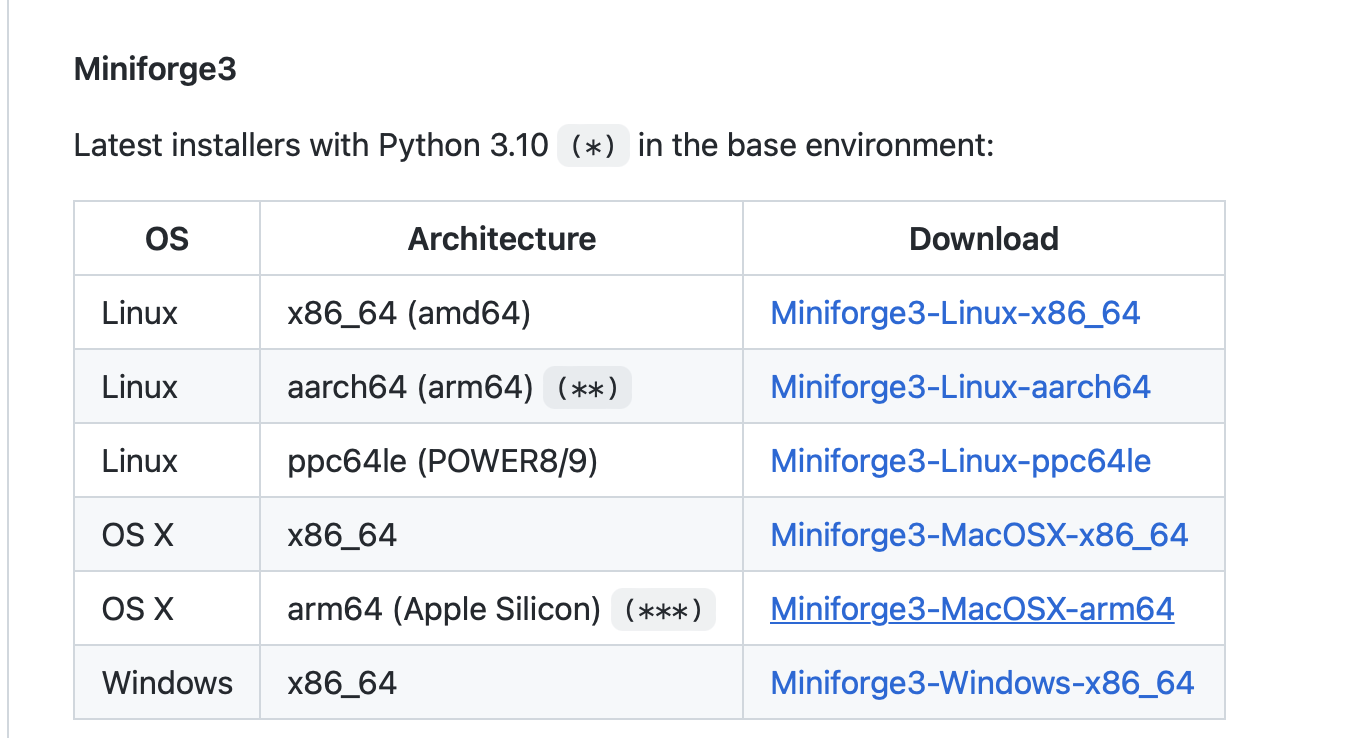
Miniforge installation options
You can then install the conda package manager by executing the respective shell script and following the instructions:
sh Miniforge3-Linux-x86_64.shNext, create a new conda environment:
conda create -n neurips2023-1 python=3.10 --yes conda activate neurips2023-1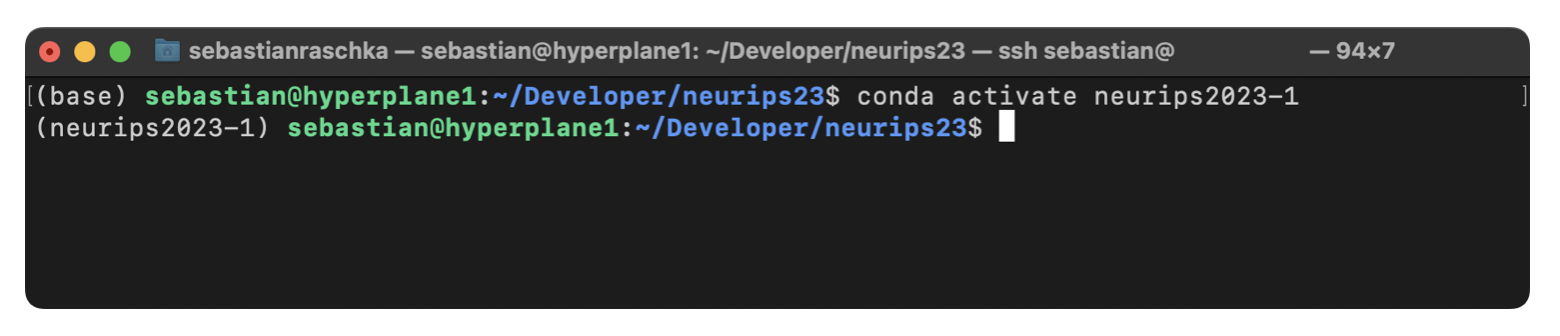
When I am working on a remote machine, I also like using to be able to restart my terminal session in case I get reconnected:
tmux new -s neurips-1
cd ~/Developer/neurips23
conda activate neurips2023-1
Then, each time I get disconnect, I can log back into the machine and resume the session via the following command:
tmux attach -t neurips-1
After setting up a virtual environment for the NeurIPS competition, we can now clone the Lit-GPT repository and install the respective requirements. First, let’s clone the GitHub repository:
git clone https://github.com/Lightning-AI/lit-gpt.gitThis repository contains a file with the respective Python packages from that are required for using the code in this repository. However, note that Lit-GPT leverages the latest PyTorch features, so we have to install the PyTorch nightly version (unfortunately, these can’t be installed via a requirements.txt file).
We can install the latest PyTorch release by selecting and running the respective command from the , as shown in the screenshot below.
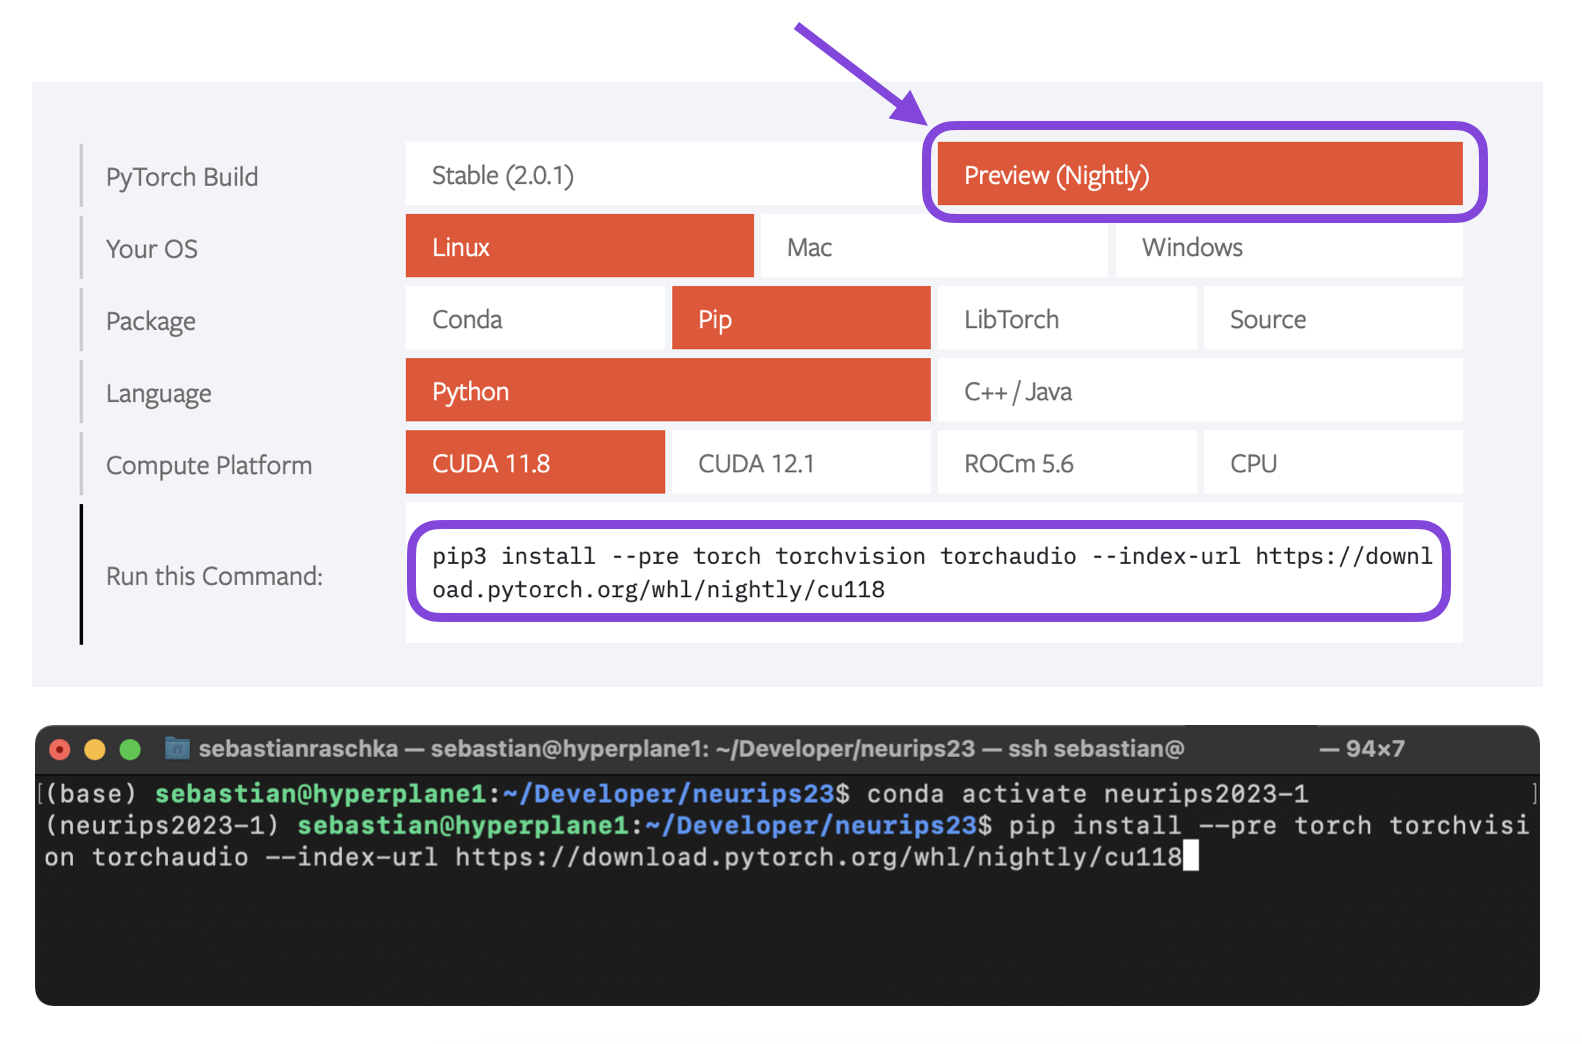
The PyTorch installation menu
Next, we can use install pip to install the remaining requirements via the following commands:
cd lit-gpt
pip install -r requirements.txt
As of this writing, I suggest Meta’s newly released as the most promising base model. To keep things simple, it probably makes sense to focus on the 7 billion parameter version, which should fit into a 24 Gb RTX 4090 or 40 Gb A100 GPU when using parameter-efficient finetuning techniques. (Please see the if you want to download other models.)
We can download the 7B Llama 2 base model using the scripts/download.py script provided in the Lit-GPT repository. The downloaded file will require approximately 13 GB of disk space.
However, first, you need to complete the following steps:
Create a Hugging Face (HF) account at https://huggingface.co/meta-llama/Llama-2-7b.
Apply for Llama-2 access at https://huggingface.co/meta-llama/Llama-2-7b.
, which you can generate under https://huggingface.co/settings/tokens.
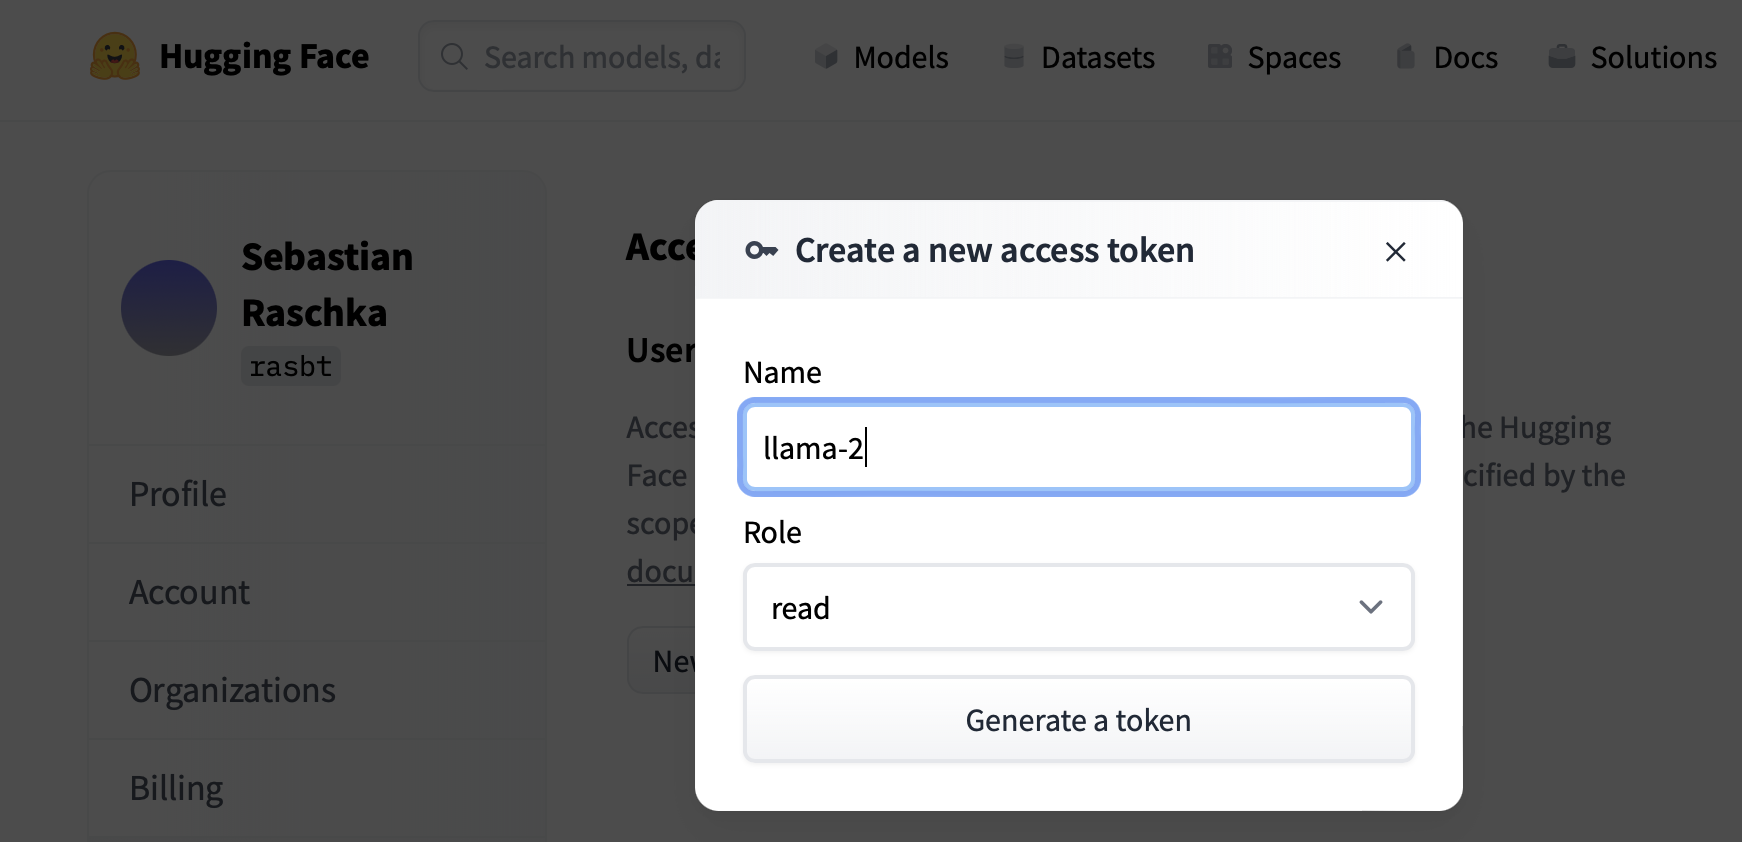
Next, to download the Llama 7B model, we need to provide the HF token via the --token
cd ~/Developer/neurips23/lit-gpt
pip install huggingface_hub
python scripts/download.py --repo_id meta-llama/Llama-2-7b-hf --token your_hf_token
(Here, your_hf_token is the token you can copy from your user account on the HF website.)
If you see the message
Your request to access model meta-llama/Llama-2-7b-hf is awaiting a review from the repo authors.
you may have to wait (currently 1-2 days) for approval.
The good news is that we can use the 7B OpenLLaMA model in the meantime, which doesn’t require authentication:
python scripts/download.py --repo_id openlm-research/open_llama_7b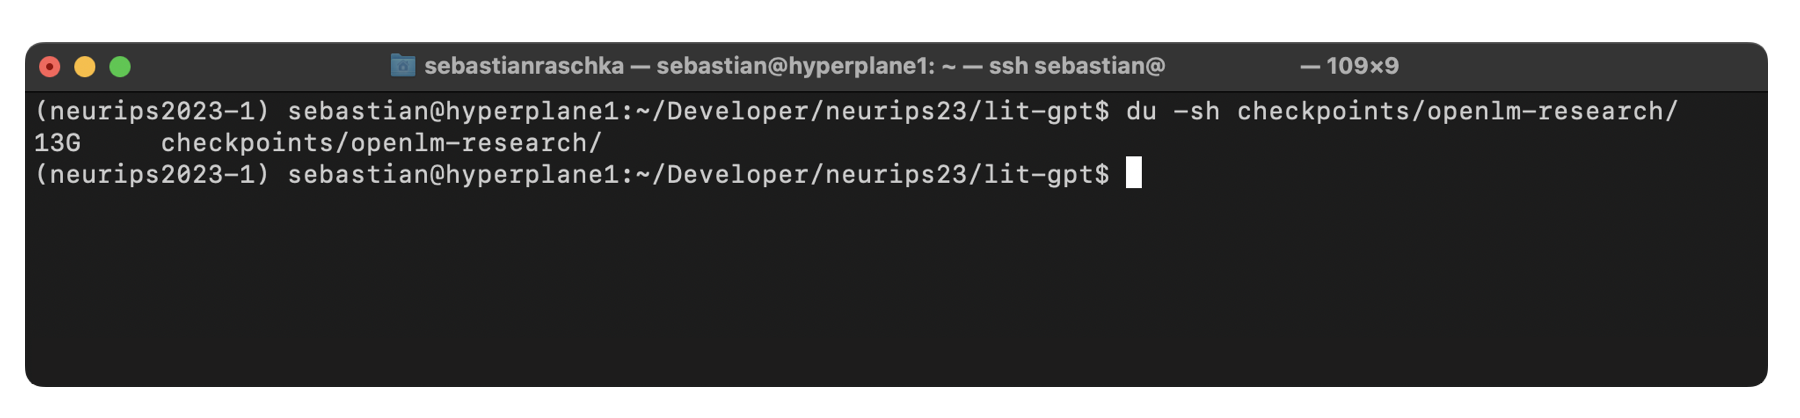
(You may also use the smaller 3 billion parameter version via --repo_id openlm-research/open_llama_3b for experimentation.)
By default, the checkpoint files will be saved in a local directory checkpoints/ inside the Lit-GPT repository.
Next, we convert the downloaded file into the common weight format used by all models in Lit-GPT:
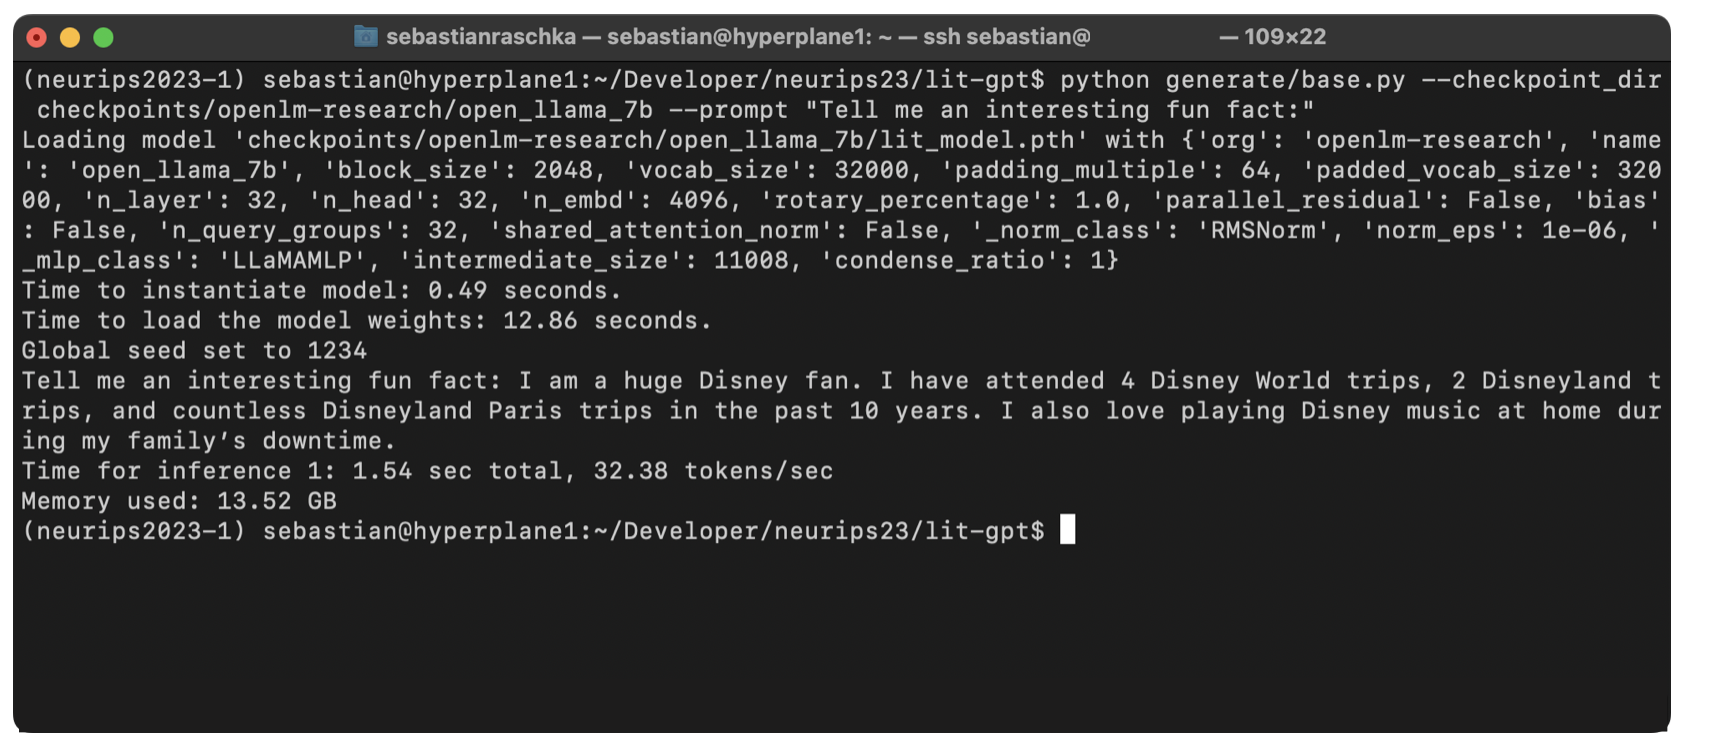
python scripts/convert_hf_checkpoint.py --checkpoint_dir checkpoints/openlm-research/open_llama_7bBefore we prepare the dataset and finetune the model, let’s make sure it works by using the respective generate script:
python generate/base.py --checkpoint_dir checkpoints/openlm-research/open_llama_7b --prompt "Tell me an interesting fun fact:"Note that base models are trained as text-completion models in contrast to instruction-finetuned models, which can be used for chatting. We use a base model here since finetuning is part of the competition. However, we can see that even though the model was only trained to predict the next word, it can come up with an interesting response:
Tip: Using Symlinks
to avoid redownloading or copying the original model checkpoints or datsets. For instance, if the model checkpoints sit in a shared directory /shared/data/checkpoints you can create a symbolic link inside the lit-gpt repository as follows:
 cd ~/Developer/neurips23/experiment1/lit-gpt
 ln -s /shared/data/checkpoints checkpoints
(You can use the same ln -s command to create a symbolic link to your dataset.)
I highly recommend checking the for up-to-date information on the permitted models and datasets. As of this writing, the following datasets are allowed, as mentioned earlier:
UPDATE: The organizers just disallowed the use of Alpaca-Libre in the competition since it is against the policy, saying that no LLM-generated data can be used in this competition.
To keep it simple, we will be using Alpaca Libre for this competition, which we briefly covered in the Datasets and Tasks section at the beginning of this article. You can download it as follows, which converts the original .json file into a PyTorch tensor format to accelerate the data loading later:
python scripts/prepare_alpaca_libre.py \
--checkpoint_dir checkpoints/openlm-research/open_llama_7b/
(This should be fast; the processed Alpaca-Libre dataset, saved under ./data/alpaca_libre/, will occupy approximately 120 Mb.)
Note: If this prepare_alpaca_libre.py file is not available in your repository yet, that’s likely because I just recently submitted it to Lit-GPT, and it has not been merged yet. In that case, you can download it from or use the regular Alpaca dataset via scripts/prepare_alpaca.py instead.
Attention: if you are considering using a different model later, you have to prepare the dataset again with a different –checkpoint_dir flag since different models may use different tokenizers.
After completing the dataset preparation steps outlined in the previous section, we are now ready for the more interesting part, finetuning the model. This is where we get to be creative, combining or thinking of new research ideas to improve the modeling performance of the base models.
I plan to write about interesting research directions to try in upcoming articles. To keep this guide focused on the main steps, we will focus on establishing a performance baseline here. For this, let’s take the OpenLLaMA 7B model and finetune it on the Alpaca-Libre dataset using low-rank adaptation (LoRA):
 python finetune/lora.py \
 --data_dir data/alpaca_libre/ \
 --checkpoint_dir checkpoints/openlm-research/open_llama_7b/ \
 --precision bf16-true
(You can see the additional options via python finetune/lora.py --help.)
Using the default settings, that is, a microbatch size of 4, context length of 2048, and bf16-true precision as shown above (explanations will follow later in this article), this took about 7:28 h using an A100:
{'eval_interval': 100, 'save_interval': 100, 'eval_iters': 100, 'log_interval': 1, 'devices': 1, 'learning_rate': 0.0003, 'batch_size': 128, 'micro_batch_size': 4, ...} Global seed set to 1337 Loading model 'checkpoints/openlm-research/open_llama_7b/lit_model.pth' with {'org': 'openlm-research', 'name': 'open_llama_7b', 'block_size': 2048, 'vocab_size': 32000, ...} Number of trainable parameters: 4,194,304 Number of non trainable parameters: 6,738,415,616 Validating ... ... Estimated TFLOPs: 357.80 Measured TFLOPs: 324.99 ... iter 30 step 0: loss 1.9667, iter time: 92.21ms iter 31 step 1: loss 1.9221, iter time: 196.06ms (optimizer.step) iter 32 step 1: loss 1.0282, iter time: 199.56ms iter 33 step 1: loss 1.3246, iter time: 136.38ms iter 34 step 1: loss 2.0406, iter time: 94.96ms iter 35 step 1: loss 2.2522, iter time: 84.61ms iter 36 step 1: loss 1.4814, iter time: 113.93ms iter 37 step 1: loss 1.7872, iter time: 92.81ms ... ... iter 49990 step 1562: loss 0.5110, iter time: 84.79ms iter 49991 step 1562: loss 0.5513, iter time: 147.55ms iter 49992 step 1562: loss 0.4352, iter time: 134.89ms iter 49993 step 1562: loss 0.3533, iter time: 101.12ms iter 49994 step 1562: loss 0.4636, iter time: 166.13ms iter 49995 step 1562: loss 0.5932, iter time: 96.34ms iter 49996 step 1562: loss 0.4907, iter time: 131.20ms iter 49997 step 1562: loss 0.4948, iter time: 135.04ms iter 49998 step 1562: loss 0.5330, iter time: 84.70ms iter 49999 step 1562: loss 0.4570, iter time: 100.29ms Training time: 26239.77s Saving LoRA weights to 'out/lora/alpaca/lit_model_lora_finetuned.pth'
print(f"Memory used: {torch.cuda.max_memory_allocated() / 1e9:.02f} GB", file=sys.stderr)
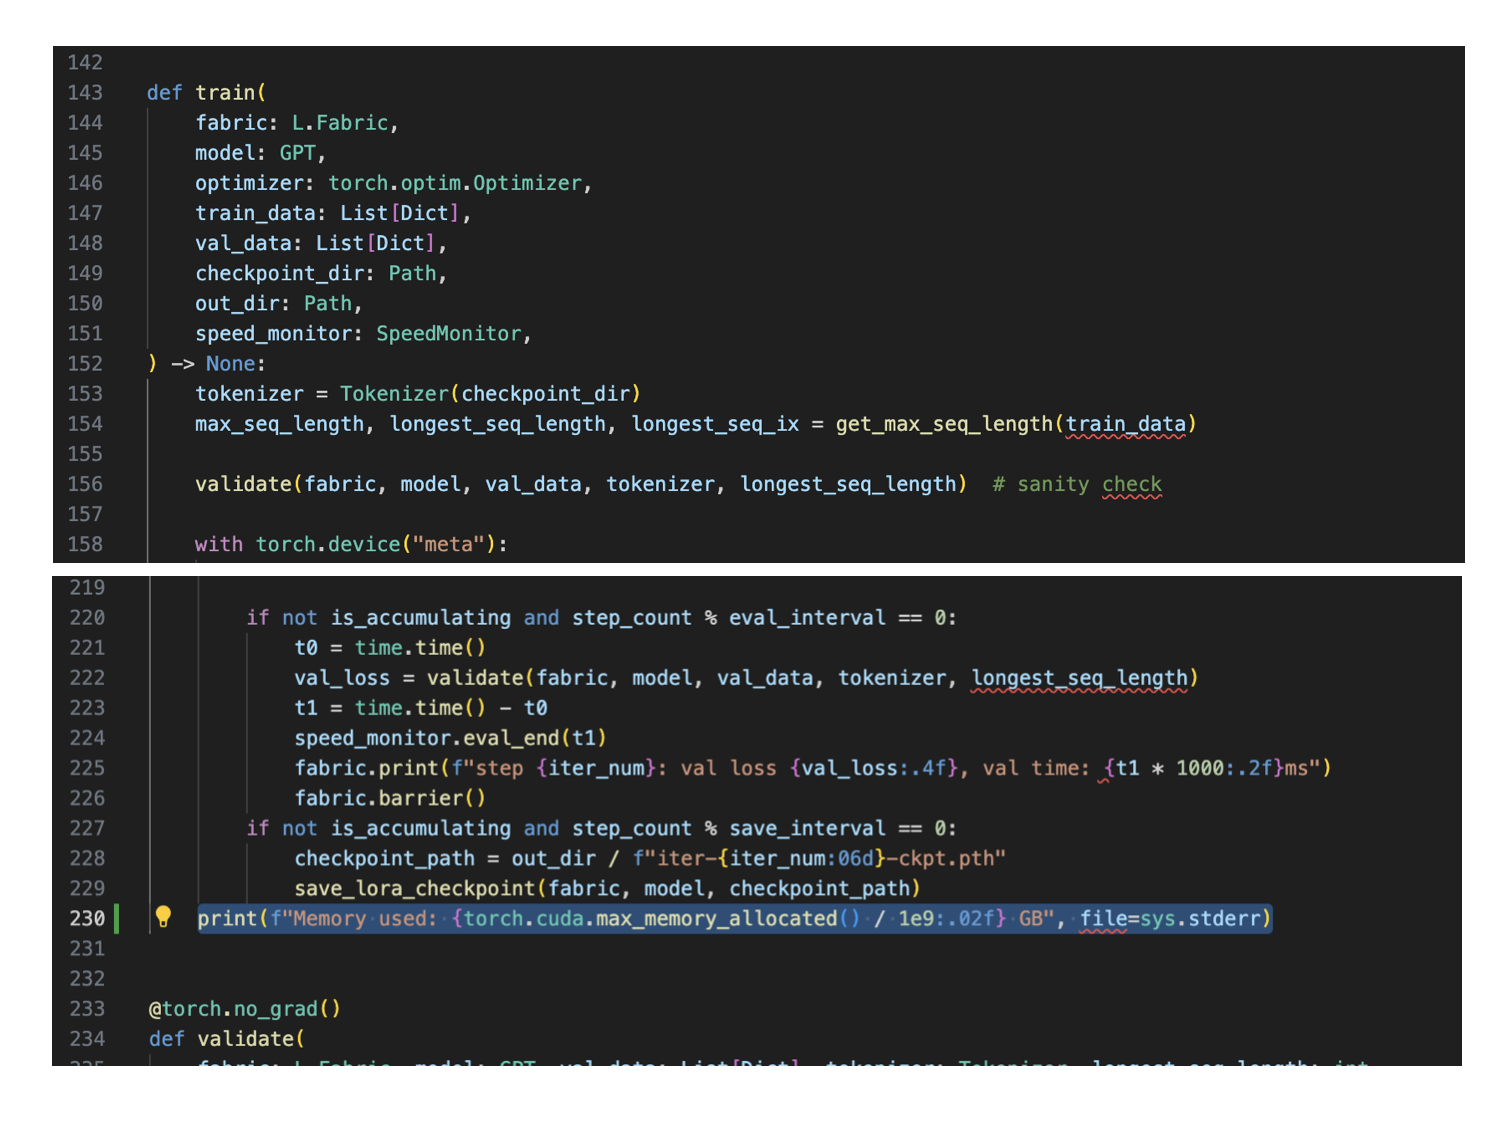
In the case of the model above, that prints the following:
Memory used: 28.81 GB
Given that the competition allows A100 GPUs with 40 GB RAM, this tells us that we can increase the number of trainable parameters, microbatch size, or something else to increase the RAM usage by ~11 GB to fully utilize this GPU.
By the way, QLoRA-like tuning should also be supported via --quantize "bnb.nf4" via . This will bring down the memory consumption to 17.04 GB so that you can run it on an RTX 4090. If you are using an RTX 4090, there will also be more tips on reducing memory requirements in the following sections.
generate/lora.py script as follows:
python generate/lora.py --prompt "how do you make pizza?" \
--checkpoint_dir \
'/home/sebastian/Developer/neurips23/lit-gpt/checkpoints/openlm-research/open_llama_7b'

10 – Changing Finetuning Settings
In the previous sections, we finetuned and used a base model with default settings. Of course, we will need to make changes if we want to actually compete in the competition. I am planning to cover research directions in future articles, but for now, I want to briefly introduce a few settings to get the most out of the provided code.
Earlier, in the Establishing a Finetuning Baseline section, we mentioned default settings such as a microbatch size of 4, context length of 2048, and so forth. These can be directly changed at the top of the script itself:
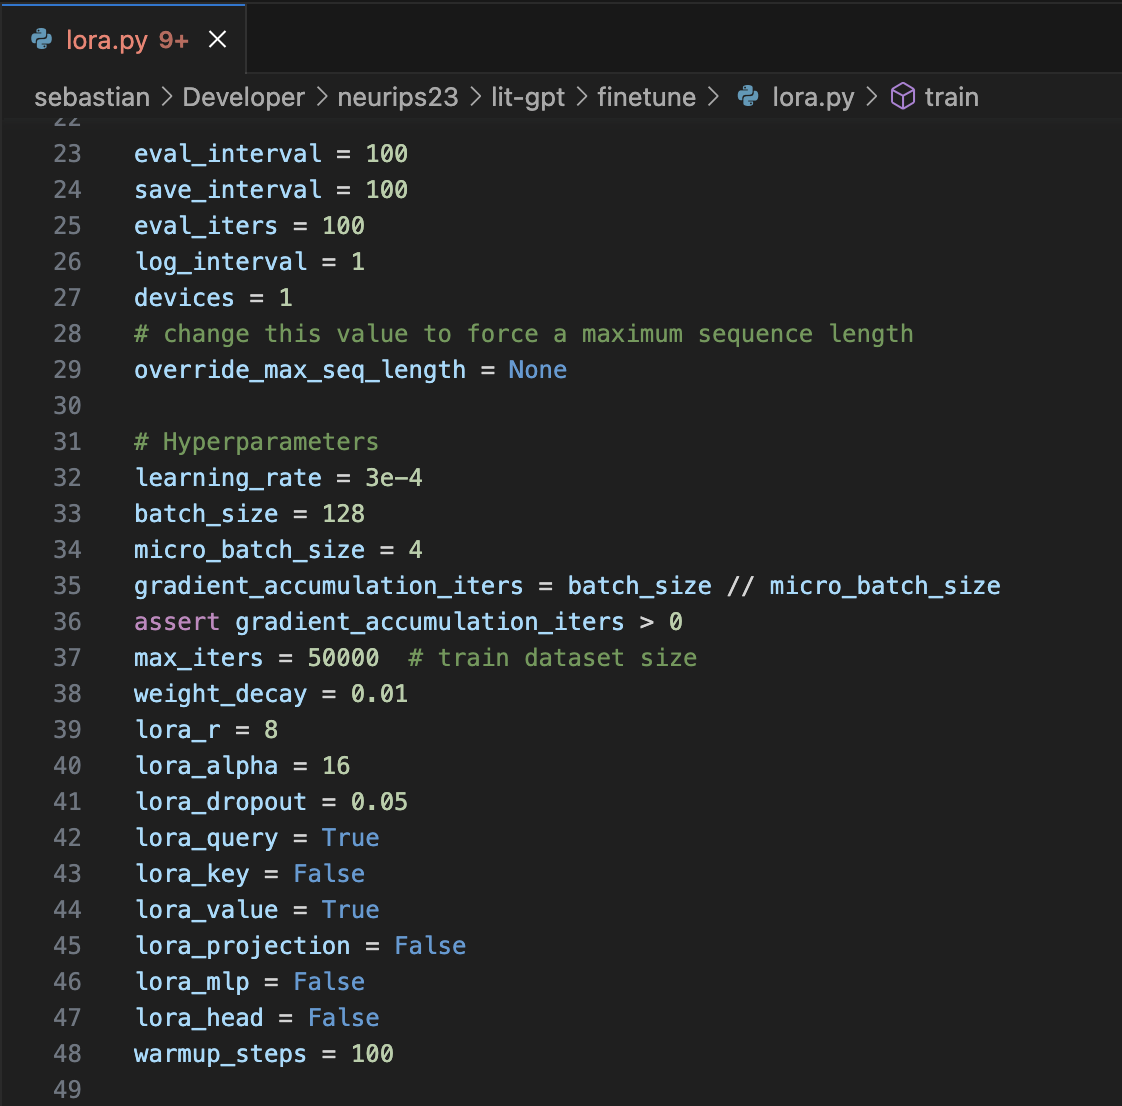
*_interval settings
The *_interval settings are to specify how often the model is evaluated and saved. This is useful when developing the model. However, before submission, it’s probably a good idea to increase this number to save a few seconds or minutes.
devices
devices specifies how many devices are used. If this number is larger than 2, it uses fully-sharded data parallelism, meaning that it a) runs data parallelism and b) divides large layers across multiple GPUs. If you are interested, I have additional explanations of multi-GPU training in
devices=1.
override_max_seq_length
Setting override_max_seq_length=None means that a model’s default context length is used. For OpenLLaMA, that’s 2048, which is coincidentally also the maximum length permitted by the competition. So, in this case, it’s a good idea to set it to override_max_seq_length=2048 if you are planning to experiment with different models (which you probably should if you want to have a competitive submission.)
learning_rate
The learning_rate is a hyperparameter that we will have to tinker with. Usually, we determine this by monitoring the loss and evaluating the model on a validation set. A detailed discussion for tuning learning rates is out of the scope of this article, but you may like of my deep learning course.
batch_size and micro_batch_size
Since the model uses gradient accumulationm there are two batch size settings, batch_size and micro_batch_size. The micro_batch_size is the batch size that the model receives in each forward pass. The batch_size determines the actual batch size for the model updates in the backward pass.
In other words, if the batch_size is set to 128 and the micro_batch_size is set to 4, the model will perform 32 forward passes (128 / 4 = 32) to accumulate the loss for each backward pass. The model performance and gradient updates are exactly the same as regular training, though. We can think of gradient accumulation as a trick to save memory. If you want to learn more about gradient accumulation, check out my blog post .
Explanation of gradient accumulation from Finetuning LLMs on a Single GPU Using Gradient Accumulation.
micro_batch_size from 4 to 2, we can save significant compute memory without sacrificing modeling performance. However, it will also increase the runtime. It’s a trade-off we have to keep in mind when working on the competition.
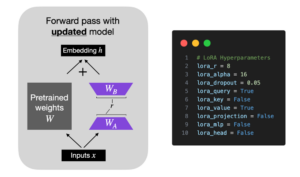
lora_* parameters
The lora_* set the trainable parameters for LoRA. Changing lora_key from False to True, for example, will enable LoRA for the LLMs key weights next to the value and query weights. In practice, this can bring the performance closer to full finetuning.

max_iter is set to 100 for quick experimentation in the screenshot above, which means the script should finish in about 2 min. However, for the “real” training, you want to set the number of iterations at least equal to the number of records in the dataset (50k in the case of Alpaca or Alpaca-Libre).
A note about full finetuning
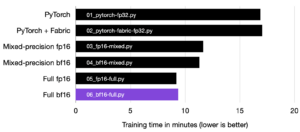
The 7B OpenLLaMA model has 6,738,415,616 parameters. However, only a small fraction of parameters are trainable in the LoRA script (4,194,304 by default), which enables parameter-efficient finetuning. Why not finetuning the full model? That’s because it consumes significant memory. I was not able to fit full finetuning into a single A100.
In fact, I needed 6 GPUs and tensor sharding to make it work. Below is a benchmark from my

As hinted earlier, one of the main challenges in this competition will be avoiding out-of-memory errors since our GPU RAM is limited. Above, we have briefly discussed tricks such as gradient accumulation, quantization, choosing smaller base models, and LoRA.
We can add many additional tricks, including automatic mixed-precision training, low-precision floats, efficient model initialization, choosing leaner optimizers, and parameter offloading. Discussing all these techniques is out of the scope of this article, but the first good news is that most of these are already implemented in the Lit-GPT code.
The second good news is that I have a standalone article that discusses all these methods in more detail: .
Memory tricks from Optimizing Memory Usage for Training LLMs and Vision Transformers in PyTorch.
The article also explains Lightning’s , an open-source library to conveniently accelerate PyTorch model training, which is used inside of Lit-GPT to reduce boilerplate code.
Initially, I planned to write a thorough section with research ideas and directions to explore in this competition. However, due to this article’s (almost excessive) length, I will defer these to a future write-up. However, in the mean time, you may be able to find some inspiration in my Research Highlights series: , , and .
13 – Evaluating the Model Locally
Since most readers probably reached the point where they read a long Starter Guide and can’t wait to get started themselves. However, there is one more thing that’s worth discussing: evaluating the modeling performance! However, I promise to keep it short (and I plan to follow up with a more detailed evaluation article in the future).
The competition submissions will be evaluated on a subset of , which consists of 42 scenarios and 59 metrics.
These include scenarios like and , which are also covered in other benchmarks, such as EleutherAI’s .
To prevent overfitting, it is maybe not a bad idea to develop the models on a few tasks from the Evaluation Harness first (think of them as validation sets) before applying them to the HELM benchmark. Since the competition evaluation will be based on a subset of HELM, we can think of HELM as more of a test set.
The Language Model Evaluation Harness is currently supported in Lit-GPT directly (and ). Let’s briefly look at how to use the Evaluation Harness with Lit-GPT.
First, we have to clone and install the official Evaluation Harness repository:
 git clone https://github.com/EleutherAI/lm-evaluation-harness
 cd lm-evaluation-harness
 pip install -e .
 cd ..
(Note that pip install -e . will install it locally and run python setup.py develop so that tweaks in the lm-evaluation-harness package don’t require reinstallation.)
Then, to evaluate the OpenLLaMA model, we can run the harness on a checkpoint file as follows from the lit-gpt repo:
 python eval/lm_eval_harness.py \
   --checkpoint_dir "checkpoints/openlm-research/open_llama_7b/" \
   --precision "bf16-true" \
   --eval_tasks "[truthfulqa_mc]" \
   --batch_size 4 \
   --save_filepath "results-openllama-7b.json"
This should only take 5 minutes to run.
(For a LoRA-finetuned model, there is an equivalent lm_eval_harness_lora.py script in the Lit-GPT repo.)
[truthfulqa_mc] with [truthfulqa_mc,hellaswag].
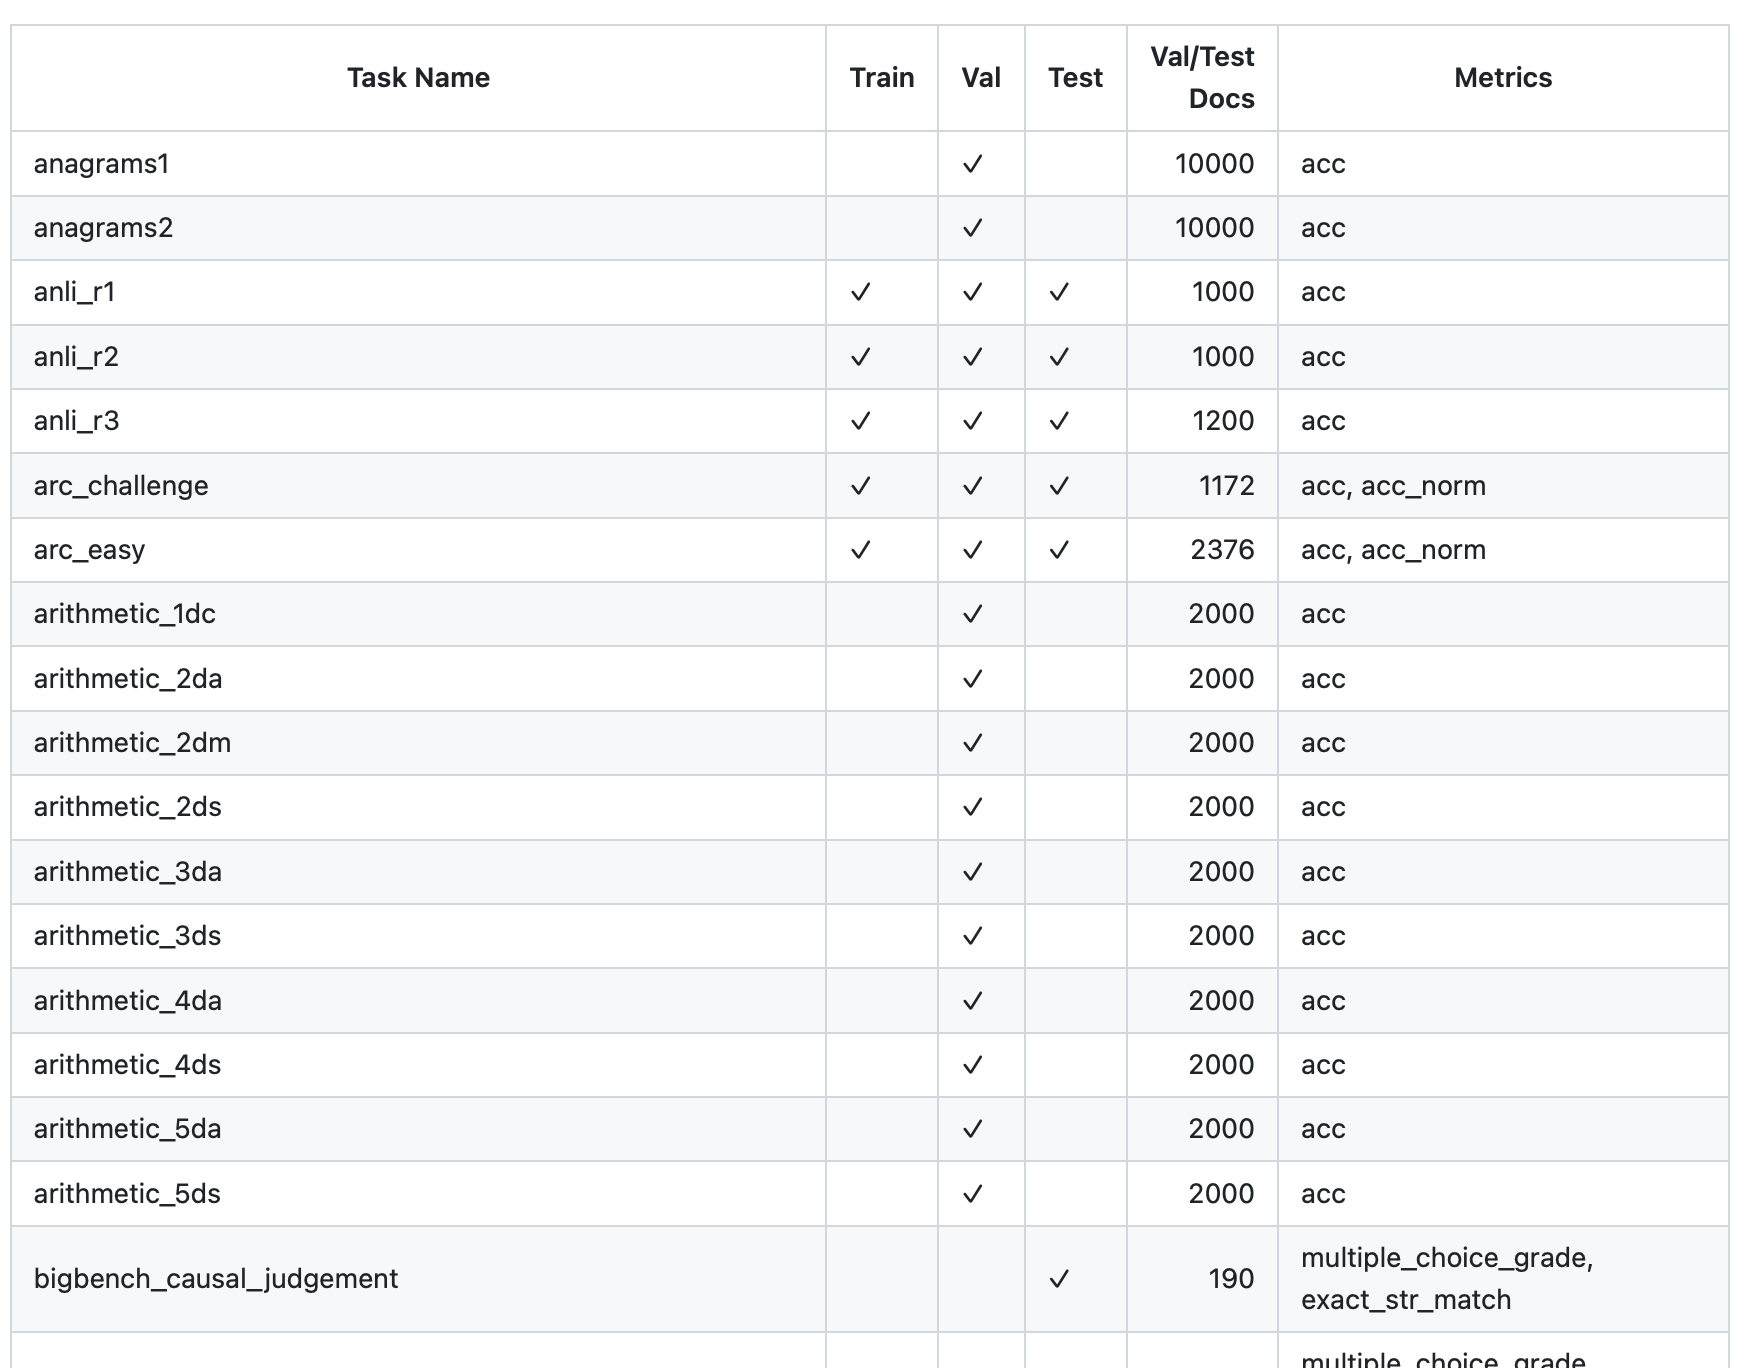
Small excerpt of the tasks supported in the Evaluation Harness
This results in the following JSON output:
 {"results":
     {"truthfulqa_mc":
         {"mc1": 0.23133414932680538,
          "mc1_stderr": 0.014761945174862673,
          "mc2": 0.352784342017196,
          "mc2_stderr": 0.01356224149206526}},
          "versions": {"truthfulqa_mc": 1},
          "config": {"model": "open_llama_7b", "num_fewshot": 0,
                      "batch_size": 4, "device": "cuda:0",
                      "no_cache": true, "limit": null,
                      "bootstrap_iters": 2, "description_dict": null
 }}
The resulting scores, mc1 and mc2, measure the proportion of how often the model generates true statements (on a scale from 0 to 1). The difference between mc1 and mc2 scores are explained in the repository:
“MC1 (Single-true): Given a question and 4-5 answer choices, select the only correct answer. The model’s selection is the answer choice to which it assigns the highest log-probability of completion following the question, independent of the other answer choices. The score is the simple accuracy across all questions.”
“MC2 (Multi-true): Given a question and multiple true / false reference answers, the score is the normalized total probability assigned to the set of true answers.”
Will the TruthfulnessQA be used for the final model evaluation? Likely not. I am using it here as a simple reference. Note that Llama 2 Chat models (which are not permitted in this competition since they are already finetuned) may be a good reference for a good score.
For comparison, we can run the same evaluation code on the Llama 2 7b chat model as follows:
 python eval/lm_eval_harness.py \
    --checkpoint_dir "checkpoints/meta-llama/Llama-2-7b-chat-hf/" \
    --precision "bf16-true" \
    --eval_tasks "[truthfulqa_mc]" \
    --batch_size 4 \
    --save_filepath "results-llama2-7b.json"
This results in mc1 and mc2 scores of 0.306 and 0.454. This doesn’t sound great: 0.3 means 30% of the answers are truthful. However, for comparison, a 25x larger 175B GPT-3 model also only achieved 21%, according to the repository.
14 – Making Submissions
The competition currently only allows 3 submissions. So, I highly recommend developing your models locally first before making your first submissions (the competition deadline is currently listed as October 15th, 2023).
As mentioned earlier, you can use the Evaluation Harness for model evaluation. Also, HELM evaluation will be added to Lit-GPT soon, which can be useful for evaluating your final model candidates before submission.
For the submission itself, you will be required to submit a Docker image. Fortunately, the organizers have a GitHub repository with the exact steps as well as a toy-submission setup guide to test your model locally before submission. (Before pasting code examples that may be outdated in the future, I recommend consulting the .)
Note that the organizers also maintain a for additional questions about the competition.
I am really excited for the research community to develop (more) efficient methods for finetuning LLMs. And I hope you find this competition as useful and exciting as I do. Please spread the word about this competition — the more people participate, the more we can advance the efficient LLM research field.
If you have any questions, these are some of the best ways to reach out:
If you encounter any problems with Lit-GPT, please if you think it is a bug.
If you find any problems with the code in this article, you may also file an issue and tag me with my or — I am more than happy to get that fixed!
For Lit-GPT-related questions about the challenge, my colleagues at Lightning AI also maintain a Discord channel .
Furthermore, with improvements and implementations of new techniques would be very welcome!
Happy coding and experimenting!