Takeaways
Learn how to finetune large language models (LLMs) on a custom dataset. We will be using Lit-GPT, an optimized collection of open-source LLMs for finetuning and inference. It supports – LLaMA 2, Falcon, StableLM, Vicuna, LongChat, and a couple of other top performing open source large language models.The AI community’s effort has led to the development of many high-quality open-source LLMs, including but not limited to LLaMA 2, Falcon, StableLM, and Pythia. You can finetune these models on a custom instruction dataset to adapt to your specific task, such as training a chatbot to answer financial questions.
Lightning AI recently launched Lit-GPT, the second LLM implementation in the Lit-* series after Lit-LLaMA. The goal of these Lit-* series is to provide the AI/ML community with a clean, solid, and optimized implementation of large language models with pretraining and finetuning support using LoRA and Adapter.
We will guide you through the process step by step, from installation to model download and data preparation to finetuning. If you have already completed a step or are confident about it, feel free to skip it.
Installing Lit-GPT 🦜
The Lit-GPT repository is available in the Lightning AI GitHub organization here. To get started, clone the repository and install its dependencies.
git clone <https://github.com/Lightning-AI/lit-gpt
cd lit-gpt
We are using FlashAttention, a fast and memory-efficient implementation of attention, which is only available in PyTorch Nightly 2.1 at the moment of writing this article.
# for cuda
pip install --index-url <https://download.pytorch.org/whl/nightly/cu118> --pre 'torch>=2.1.0dev'
# for cpu
pip install --index-url <https://download.pytorch.org/whl/nightly/cpu> --pre 'torch>=2.1.0dev'
Finally, install the dependencies using pip install -r requirements.txt .
Downloading the model weights
In order to use the model or finetune it we need a pre-trained weight. Thanks to the effort of open source teams, we have a bunch of open source weights that we can use for commercial purposes. Lit-GPT supports various LLMs including Llama 2, Falcon, Vicuna, and RedPajama-INCITE. You can check all the supported models here. We use the RedPajama-INCITE 3B parameter weights in this tutorial. You can find the instructions to download other supported weights like LLaMA 2 and Falcon in this tutorial section.
# download the model weights
python scripts/download.py --repo_id togethercomputer/RedPajama-INCITE-Base-3B-v1
# convert the weights to Lit-GPT format
python scripts/convert_hf_checkpoint.py --checkpoint_dir checkpoints/togethercomputer/RedPajama-INCITE-Base-3B-v1
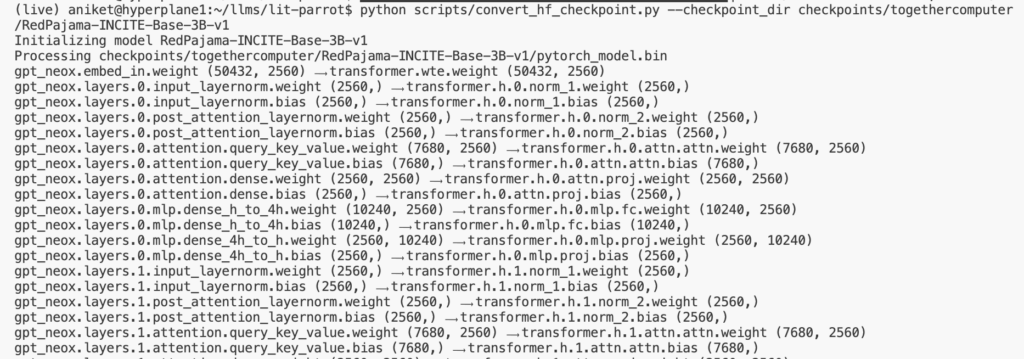
You will see, gpt_neox layers being mapped to the Lit-GPT layers in the terminal. After this step, you can find the downloaded weights in the checkpoints/togethercomputer/RedPajama-INCITE-Base-3B-v1 folder.
Prepare the dataset
In this tutorial, we will use the Dolly 2.0 instruction dataset by Databricks for finetuning. Finetuning involves two main steps- first, we process the dataset in the Lit-GPT format and then we run the finetuning script on the processed dataset.
Instruction datasets typically have three keys: instruction, input (optional context for the given instruction), and the expected response from the LLM. Below is a sample example of instruction data:
[
  {
    "instruction": "Arrange the given numbers in ascending order.",
    "input": "2, 4, 0, 8, 3",
    "output": "0, 2, 3, 4, 8"
  },
...
]
The dolly 2.0 dataset comes in JSON Lines format, which is plainly speaking a text file with rows of JSON data. It is a convenient format when processing one record at a time. The Dolly dataset contains the following keys –
{
  "instruction": "When did Virgin Australia start operating?",
  "context": "Virgin Australia, the trading name of Virgin Australia Airlines Pty Ltd, is an Australian-based airline. It is the largest airline by fleet size to use the Virgin brand. It commenced services on 31 August 2000 as Virgin Blue, with two aircraft on a single route. It suddenly found itself as a major airline in Australia's domestic market after the collapse of Ansett Australia in September 2001. The airline has since grown to directly serve 32 cities in Australia, from hubs in Brisbane, Melbourne and Sydney.",
  "response": "Virgin Australia commenced services on 31 August 2000 as Virgin Blue, with two aircraft on a single route.",
  "category": "closed_qa"
}
We need to rename context to input and response to output and we are all set to process our data.
with open(file_path, "r") as file:
    data = file.readlines()
    data = [json.loads(line) for line in data]
for item in data:
    item["input"] = item.pop("context")
    item["output"] = item.pop("response")
We can modify the existing Alpaca script for our data preparation. This script downloads data from tloen’s Alpaca-lora project and saves the processed data. It includes a prepare function that loads the raw instruction
dataset, creates prompts, and tokenizes them using the model tokenizer provided in the checkpoint_dir. The tokenized data is split into training and test sets based on the test_split_size provided and saved to the destination_path.
To modify the Alpaca script, open it from here and edit the prepare function. This is how our final function would look after mapping the keys appropriately.
DATA_FILE = "https://huggingface.co/datasets/databricks/databricks-dolly-15k/resolve/main/databricks-dolly-15k.jsonl"
DATA_FILE_NAME = "dolly_data_cleaned_archive.json"
def prepare(
    destination_path: Path = Path("data/dolly"),
    checkpoint_dir: Path = Path("checkpoints/togethercomputer/RedPajama-INCITE-Base-3B-v1"),
    test_split_size: int = 2000,
    max_seq_length: int = 256,
    seed: int = 42,
    mask_inputs: bool = False, # as in alpaca-lora
    data_file_name: str = DATA_FILE_NAME,
) -> None:
    """Prepare the Dolly dataset for instruction tuning.
    The output is a training and validation dataset saved as `train.pt` and `val.pt`,
    which stores the preprocessed and tokenized prompts and labels.
    """
    destination_path.mkdir(parents=True, exist_ok=True)
    file_path = destination_path / data_file_name
    download(file_path)
    tokenizer = Tokenizer(checkpoint_dir / "tokenizer.json", checkpoint_dir / "tokenizer_config.json")
    with open(file_path, "r") as file:
        data = file.readlines()
        data = [json.loads(line) for line in data]
    for item in data:
    item["input"] = item.pop("context")
    item["output"] = item.pop("response")
    # Partition the dataset into train and test
    train_split_size = len(data) - test_split_size
    train_set, test_set = random_split(
        data, lengths=(train_split_size, test_split_size), generator=torch.Generator().manual_seed(seed)
        )
    train_set, test_set = list(train_set), list(test_set)
    print(f"train has {len(train_set):,} samples")
    print(f"val has {len(test_set):,} samples")
    print("Processing train split ...")
    train_set = [prepare_sample(sample, tokenizer, max_seq_length, mask_inputs) for sample in tqdm(train_set)]
    torch.save(train_set, file_path.parent / "train.pt")
    print("Processing test split ...")
    test_set = [prepare_sample(sample, tokenizer, max_seq_length, mask_inputs) for sample in tqdm(test_set)]
    torch.save(test_set, file_path.parent / "test.pt")
Finally, let’s run the script by providing the data path and the model checkpoint directory.
python scripts/prepare_yourscript.py \
  --destination_path data/dolly \
  --checkpoint_dir checkpoints/togethercomputer/RedPajama-INCITE-Base-3B-v1

Finetuning the RedPajama-INCITE model
Once you have completed all the above steps, it is straightforward to start finetuning. You need to run the
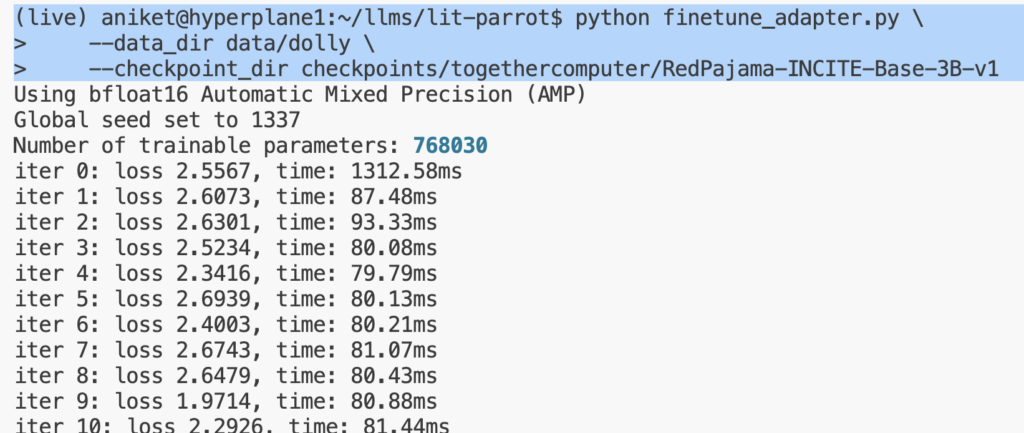
finetune/adapter.py script by providing your data path.
python finetune/adapter.py \
  --data_dir data/dolly \
  --checkpoint_dir checkpoints/togethercomputer/RedPajama-INCITE-Base-3B-v1
  --out_dir out/adapter/dolly
You can update the default number of GPUs, micro-batch size, and all the other hyperparameters in the finetuning script here.
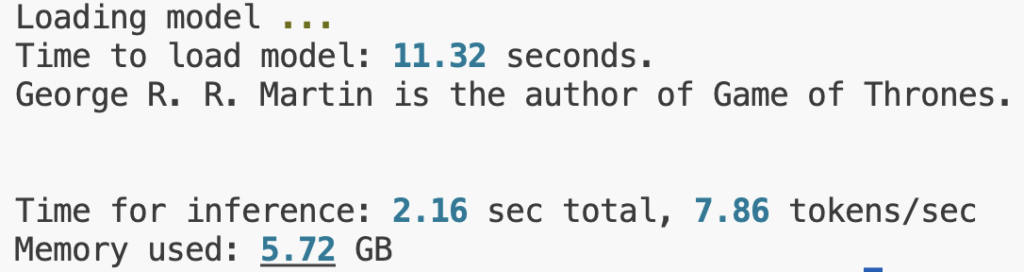
You can play with your finetuned model using the generate/adapter.py script by trying different prompts and turning the model temperature.
python generate/adapter.py \
  --adapter_path out/adapter/dolly/lit_model_adapter_finetuned.pth \
  --checkpoint_dir checkpoints/togethercomputer/RedPajama-INCITE-Base-3B-v1 \
  --prompt "who is the author of Game of thrones?"
Learn more about large language models and efficient finetuning techniques 👇
This article provided you with short step-by-step instructions to finetune your own large language model. We saw that thanks to parameter-efficient finetuning techniques, it’s possible to do it on a single GPU. If you want to learn more about these techniques, check out our more in-depth guides below.
- Falcon – A guide to finetune and inference
- Accelerating Large Language Models with Mixed-Precision Techniques
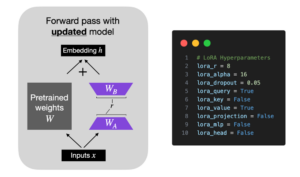
- Parameter-Efficient LLM Finetuning With Low-Rank Adaptation (LoRA)
- Understanding Parameter-Efficient Finetuning of Large Language Models: From Prefix Tuning to LLaMA-Adapters
We would love to hear what you have built with Lit-GPT. Join our Discord community to chat and ask your questions!