Takeaways
Learn step-by-step how to train a Convolutional Neural Network for Image Classification on CIFAR-10 dataset using PyTorch Lightning with callbacks and loggers for monitoring model performance.In this blog, you will learn about the different components of PyTorch Lightning and how to train an image classifier on the CIFAR-10 dataset with PyTorch Lightning. We will also discuss how to use loggers and callbacks like Tensorboard, ModelCheckpoint, etc.
PyTorch Lightning is a high-level wrapper over PyTorch which makes model training easier and scalable by removing all the boilerplates so that you can focus more on the experiments and research than engineering the model training process. PyTorch Lightning is a great way to start with deep learning for beginners as well as for experts who want to scale their training to billion+ parameter models like Llama and Stable Diffusion.
We will begin by acquainting ourselves with the key components of PyTorch Lightning, subsequently utilizing this knowledge to train an image classification model. Additionally, we will document our experiments using a logger such as Tensorboard to monitor and visualize the metrics. You can access the code used for this blog here.
Components of PyTorch Lightning
PyTorch Lightning consists of two primary components: LightningModule, and Trainer. These modules play a crucial role in organizing and automating various aspects and phases of the model training lifecycle. Let’s delve into each of them step by step. ⚡
LightningModule – Organizes the Training Loop
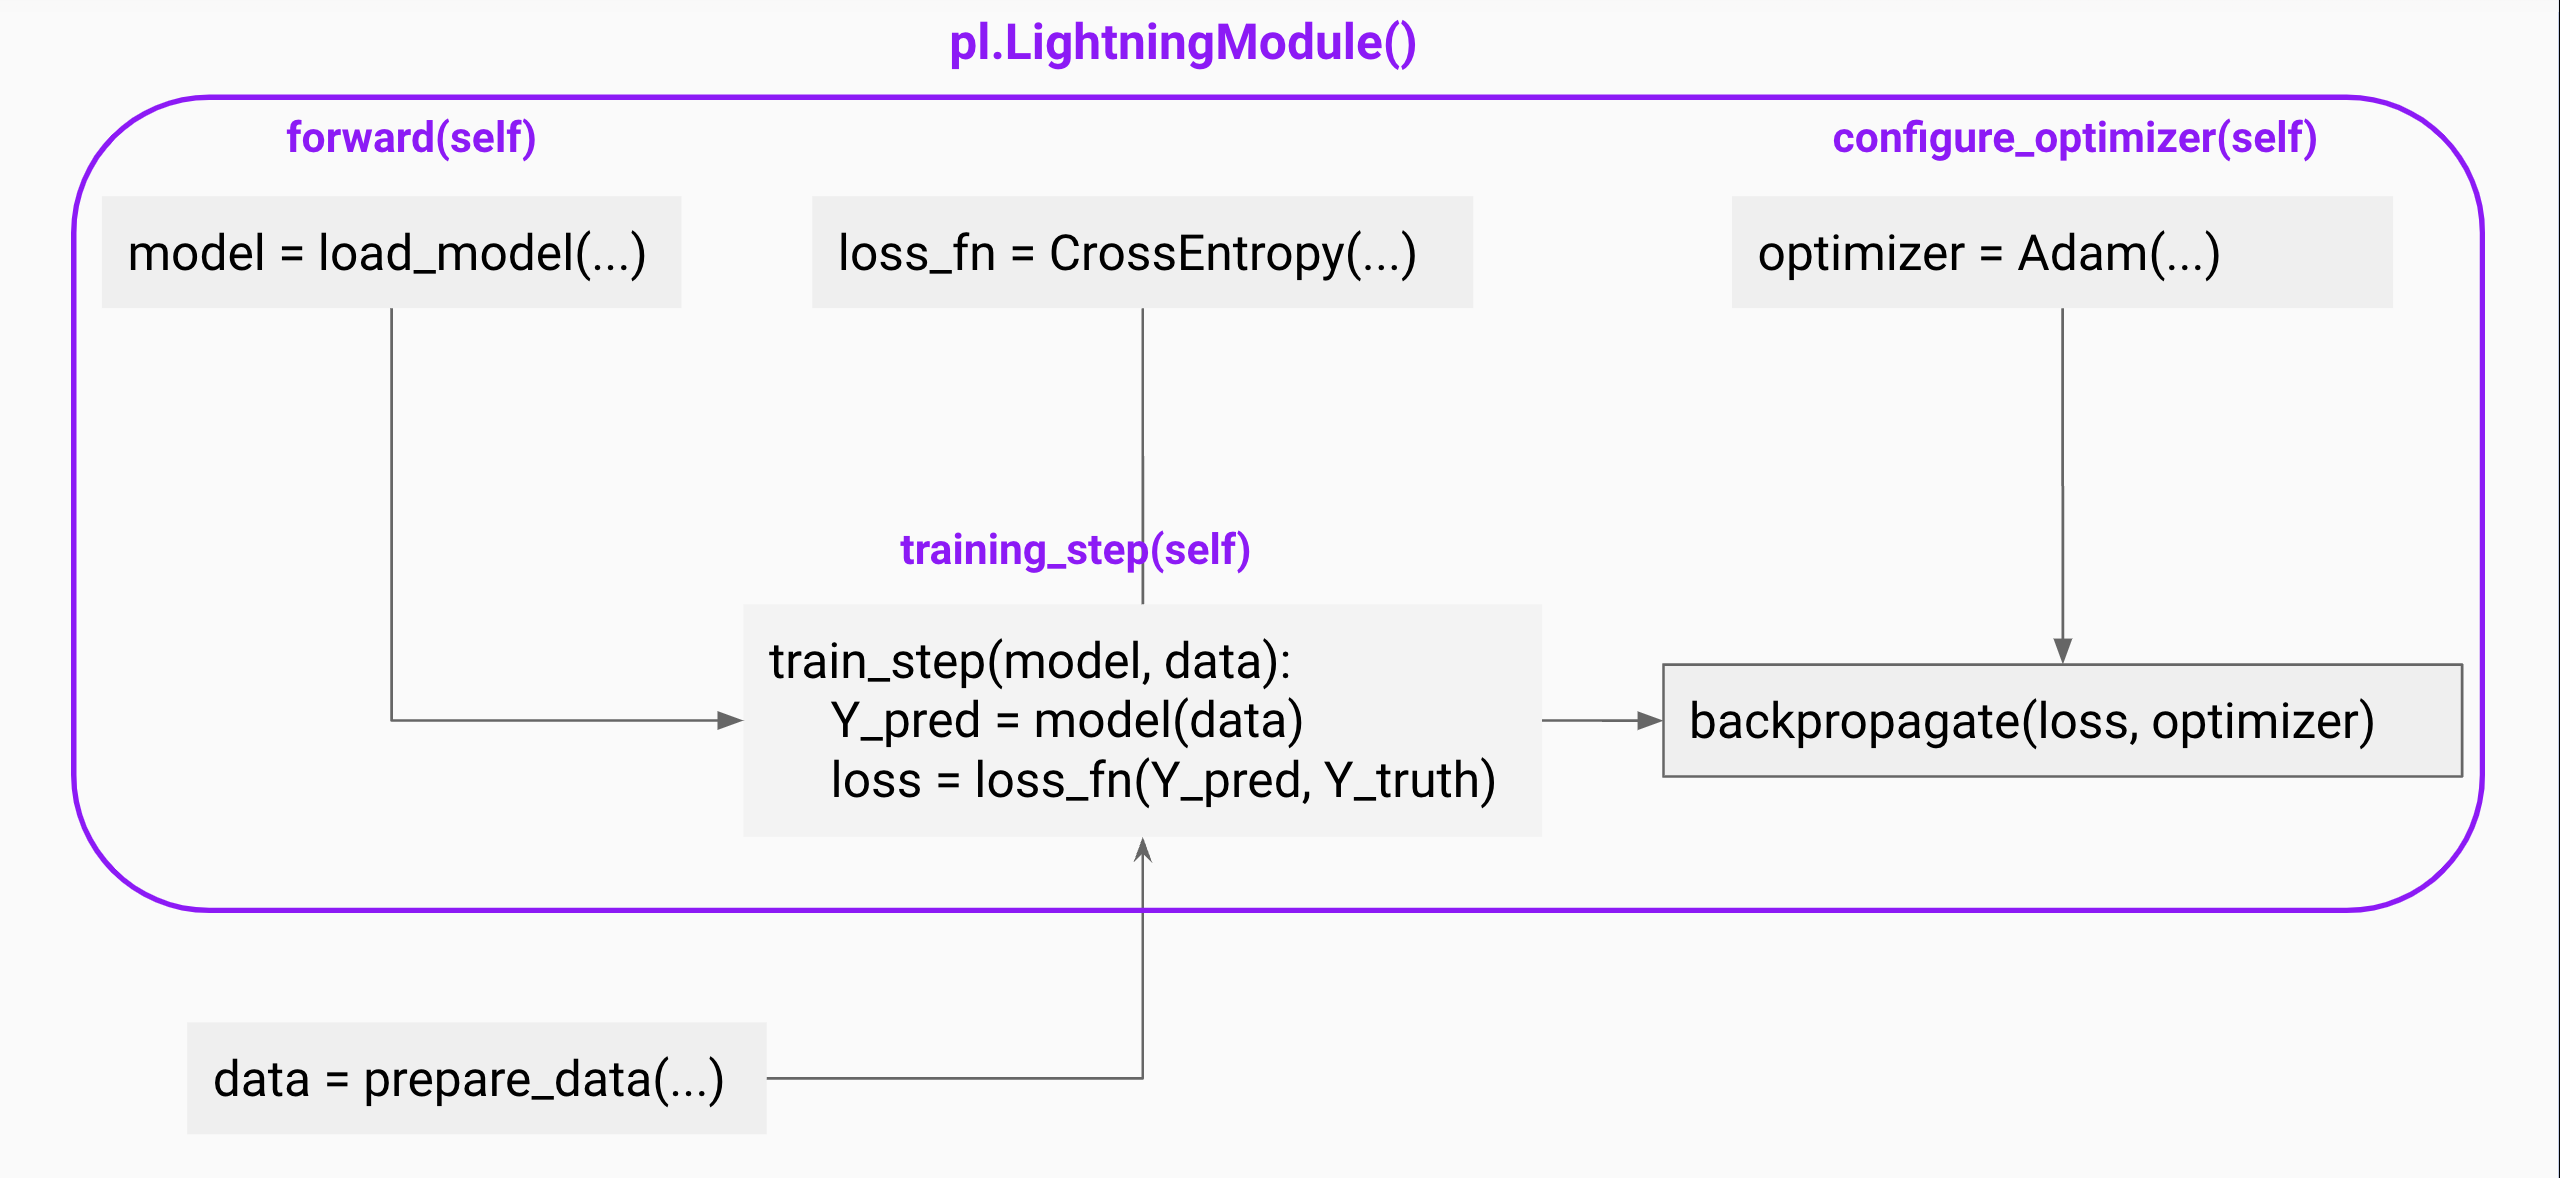
LightningModule contains all the logic for model initialization, training/validation steps, and the calculation of loss and accuracy metrics. It organizes the PyTorch code into six sections:
The LightningModule comprises
- Initialization (
__init__andsetup()) - Train logic (
training_step()) - Validation loop (
validation_step()) - Test logic (
test_step()) - Prediction logic (
predict_step()) - Optimizers and LR Schedulers (
configure_optimizers())
The example below shows a sample implementation of the LightningModule.
import torch
import torch.nn as nn
import pytorch_lightning as pl

class MyLitModel(pl.LightningModule):
    def __init__(self):
        super().__init__()
        self.model = load_model(...)
	self.loss_fn = nn.CrossEntropyLoss()

    def forward(self, x):
        return self.model(x)

    def training_step(self, batch, batch_idx):
        x, y = batch
        logits = self(x)
        loss = self.loss_fn(logits, y)
        self.log('train_loss', loss)
        return loss

    def configure_optimizers(self):
        return torch.optim.Adam(self.parameters(), lr=0.001)
In this sample example, the model is initialized with the __init__ method, and we define the training_step, which takes the batch and batch_idx arguments. We separate the inputs x and labels y from the batch, pass the inputs through the model, and calculate the cross-entropy loss. PyTorch Lightning will automatically call loss.backward() and update the Adam optimizer that we have defined in the configure_optimizers method. You don’t need to manually move the tensors from the CPU to the GPU; Lightning ⚡ will take care of that for you.
Lightning Trainer – Automating the Training Process

Once we have organized our training code with the LightningModule and loaded the dataset, we are all set to begin the training process using the Lightning Trainer.
It simplifies mixed precision training, GPU selection, setting the number of devices, distributed training, and much more. The Trainer class has 35 flags (at the time of writing this blog) that can be used for various tasks, ranging from defining the number of epochs to scaling the training for models with billions of parameters.
💡 PyTorch Lightning also offers
LightningDataModulethat can be used to organize the PyTorch dataset and dataloaders. It also automates the data loading in a distributed training environment. In this blog, we won’t discuss datamodules as you can also use theDataLoaderdirectly but I would encourage the readers to read from the official docs here.
Let’s explore how to use the Lightning Trainer with a LightningModule and go through a few of the flags using the example below. We create a Lightning Trainer object with 4 GPUs, perform mixed-precision training with the float16 data type, and finally train the MyLitModel model that we defined in the previous section. Finally, we initiate the training by providing the model and dataloaders to the trainer.fit method.
trainer = pl.Trainer(
	devices=4,
	accelerator="gpu",
	precision="fp16-mixed",
	)

model = MyLitModel()
trainer.fit(model, train_dataloder=train_dataloder)
Loggers and Callbacks
You can also add a logger, such as Tensorboard, WandB, Comet, or a simple CSVLogger, to monitor the loss or any other metrics that you’ve logged during training. For simplicity, we will use Tensorboard in this blog. You can just import the TensorBoardLogger and add it to the Trainer as shown below:
from pytorch_lightning.loggers import TensorBoardLogger

trainer = pl.Trainer(logger=TensorBoardLogger(save_dir="logs/"))

trainer.fit(model, train_dataloader, val_dataloader)
To start the Tensorboard web UI, run the command tensorboard --logdir logs/ from your terminal, and it will launch the Tensorboard UI on the default port 6006.
PyTorch Lightning provides several built-in callbacks, such as BatchSizeFinder, EarlyStopping, ModelCheckpoint, and more. These callbacks offer valuable additional functionality to manage and manipulate training at various stages of the loop. In this blog, we will use the EarlyStopping callback to automatically stop our training once the monitored metric (e.g., validation loss) stops improving. You can also configure other arguments, such as patience, to determine the number of checks before training should stop.
from pytorch_lightning.callbacks import EarlyStopping

early_stopping = EarlyStopping('val_loss', patience=7)
trainer = pl.Trainer(callbacks=early_stopping)
trainer.fit(model, train_dataloader, val_dataloader)
Training an Image Classifier (Convolutional Neural Networks or CNN) on the CIFAR-10 dataset using PyTorch Lightning
Now that we have learned about LightningModule and Trainer, we will proceed to train an image classification model using the CIFAR-10 dataset. We will begin by loading the dataset from torchvision, defining the model, training_step, and validation_step, and then create the Trainer by configuring devices and loggers to monitor our training.
Create Dataset
We use torchvision library for loading the training and validation data. We will use torchvision.transforms module to convert our images to Pytorch’s Tensor and normalize the image pixels.
import torch
import torchvision
import torchvision.transforms as transforms
import os

batch_size = 8
NUM_WORKERS = int(os.cpu_count() / 2)

transform = transforms.Compose(
    [transforms.ToTensor(),
     transforms.Normalize((0.5, 0.5, 0.5), (0.5, 0.5, 0.5))])

trainset = torchvision.datasets.CIFAR10(root='./data', train=True,
                                        download=True, transform=transform)
train_dataloader = torch.utils.data.DataLoader(trainset, batch_size=batch_size,
                                          shuffle=True, num_workers=NUM_WORKERS)

valset = torchvision.datasets.CIFAR10(root='./data', train=False,
                                       download=True, transform=transform)
val_dataloader = torch.utils.data.DataLoader(valset, batch_size=batch_size,
                                         shuffle=False, num_workers=NUM_WORKERS)
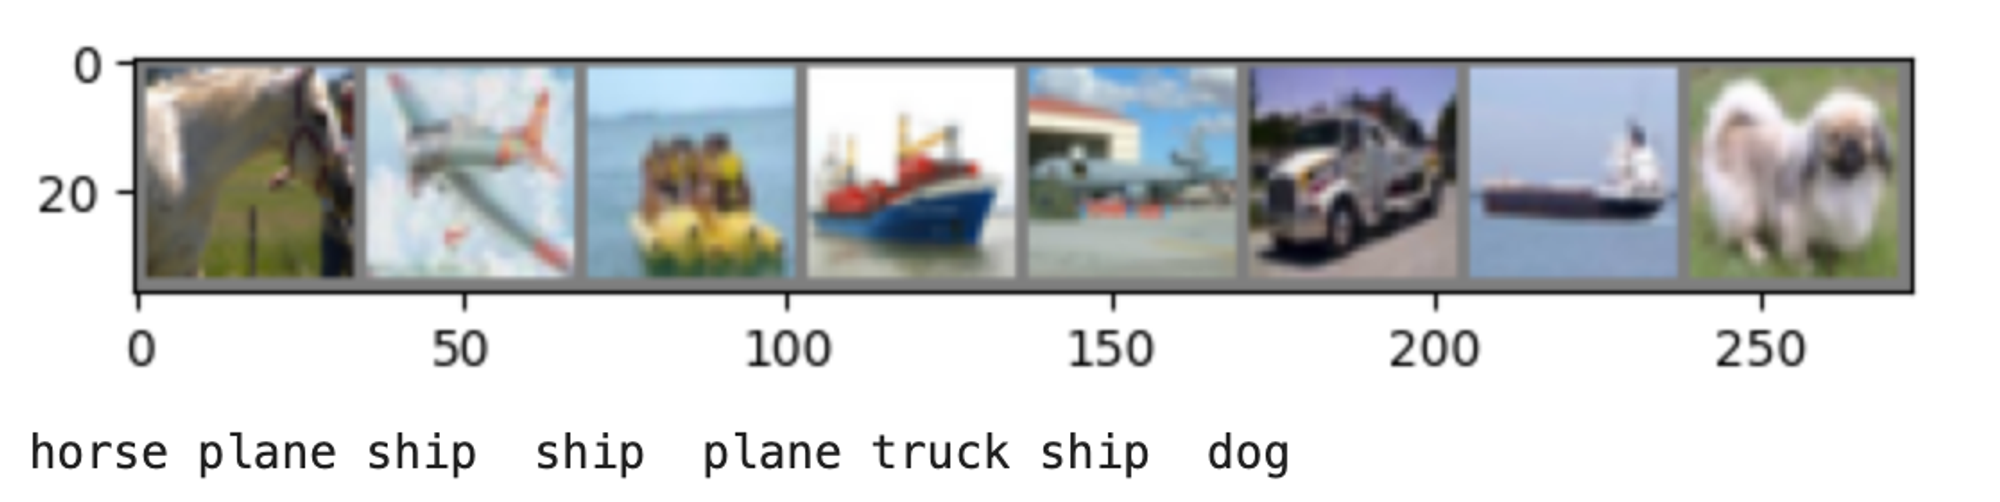
It’s a good idea to visualize your dataset before training. Our dataset contains small images with a resolution of only 32×32.
import matplotlib.pyplot as plt
import numpy as np

# functions to show an image

def imshow(img):
    img = img / 2 + 0.5     # unnormalize
    npimg = img.numpy()
    plt.imshow(np.transpose(npimg, (1, 2, 0)))
    plt.show()

# get some random training images
dataiter = iter(train_dataloader)
images, labels = next(dataiter)

# show images
imshow(torchvision.utils.make_grid(images))
# print labels
print(' '.join(f'{classes[labels[j]]:5s}' for j in range(batch_size)))
Create Model
We create a small Convolutional Neural Network (CNN) model with two convolutional layers, one max pooling, and three fully-connected layers. You can learn more about CNNs in the Deep Learning Fundamentals course.
class Net(nn.Module):
    def __init__(self):
        super().__init__()
        self.conv1 = nn.Conv2d(3, 6, 5)
        self.pool = nn.MaxPool2d(2, 2)
        self.conv2 = nn.Conv2d(6, 16, 5)
        self.fc1 = nn.Linear(16 * 5 * 5, 120)
        self.fc2 = nn.Linear(120, 84)
        self.fc3 = nn.Linear(84, 10)

    def forward(self, x):
        x = self.pool(F.relu(self.conv1(x)))
        x = self.pool(F.relu(self.conv2(x)))
        x = torch.flatten(x, 1) # flatten all dimensions except batch
        x = F.relu(self.fc1(x))
        x = F.relu(self.fc2(x))
        x = self.fc3(x)
        return x
Next, we define the LightningModule to structure our training logic. In the __init__ method, we initialize our model, accuracy metric, and loss function. We use the self.save_hyperparameters() method to store the learning rate argument. The training and validation steps calculate loss and accuracy and log the results using the self.log method. Finally, we configure the optimizer by defining SGD in the configure_optimizers method.
import pytorch_lightning as pl
from torchmetrics import Accuracy

class MyLitModel(pl.LightningModule):
    def __init__(self, lr=0.05):
        super().__init__()
        self.save_hyperparameters()
        self.model = Net()
        self.train_accuracy = Accuracy(task="multiclass", num_classes=NUM_CLASSES)
        self.val_accuracy = Accuracy(task="multiclass", num_classes=NUM_CLASSES)
        self.loss_fn = nn.CrossEntropyLoss()

    def forward(self, x):
        return self.model(x)

    def training_step(self, batch, batch_idx):
        x, y = batch
        logits = self(x)
        loss = self.loss_fn(logits, y)
        self.log("train_loss", loss)
        acc = self.train_accuracy(logits, y)
        self.log("train_accuracy", acc)
        return loss

    def validation_step(self, batch, batch_idx):
        x, y = batch
        logits = self(x)
        loss = self.loss_fn(logits, y)
        self.log("val_loss", loss)
        acc = self.val_accuracy(logits, y)
        self.log("val_accuracy", acc)

    def configure_optimizers(self):
        optimizer = torch.optim.SGD(self.parameters(), lr=self.hparams.lr, momentum=0.9)
        return optimizer
Train Model
We will create an object of MyLitModel with a learning rate of 0.001. You can also use the LearningRateFinder callback to discover an appropriate learning rate for your model and data. The model will be trained for 30 epochs, with the Trainer automatically selecting the appropriate device (CPU, GPU, or a TPU) and the number of devices. By default, it will use the total number of available GPUs when set to auto.
from pytorch_lightning.loggers import TensorBoardLogger
from pytorch_lightning.callbacks import EarlyStopping

model = MyLitModel(lr=0.001)

trainer = pl.Trainer(
    max_epochs=30,
    accelerator="auto",
    devices="auto",
    logger=TensorBoardLogger(save_dir="logs/"),
		callbacks=EarlyStopping('val_loss', patience=7),
)

trainer.fit(model, train_dataloader, val_dataloader)
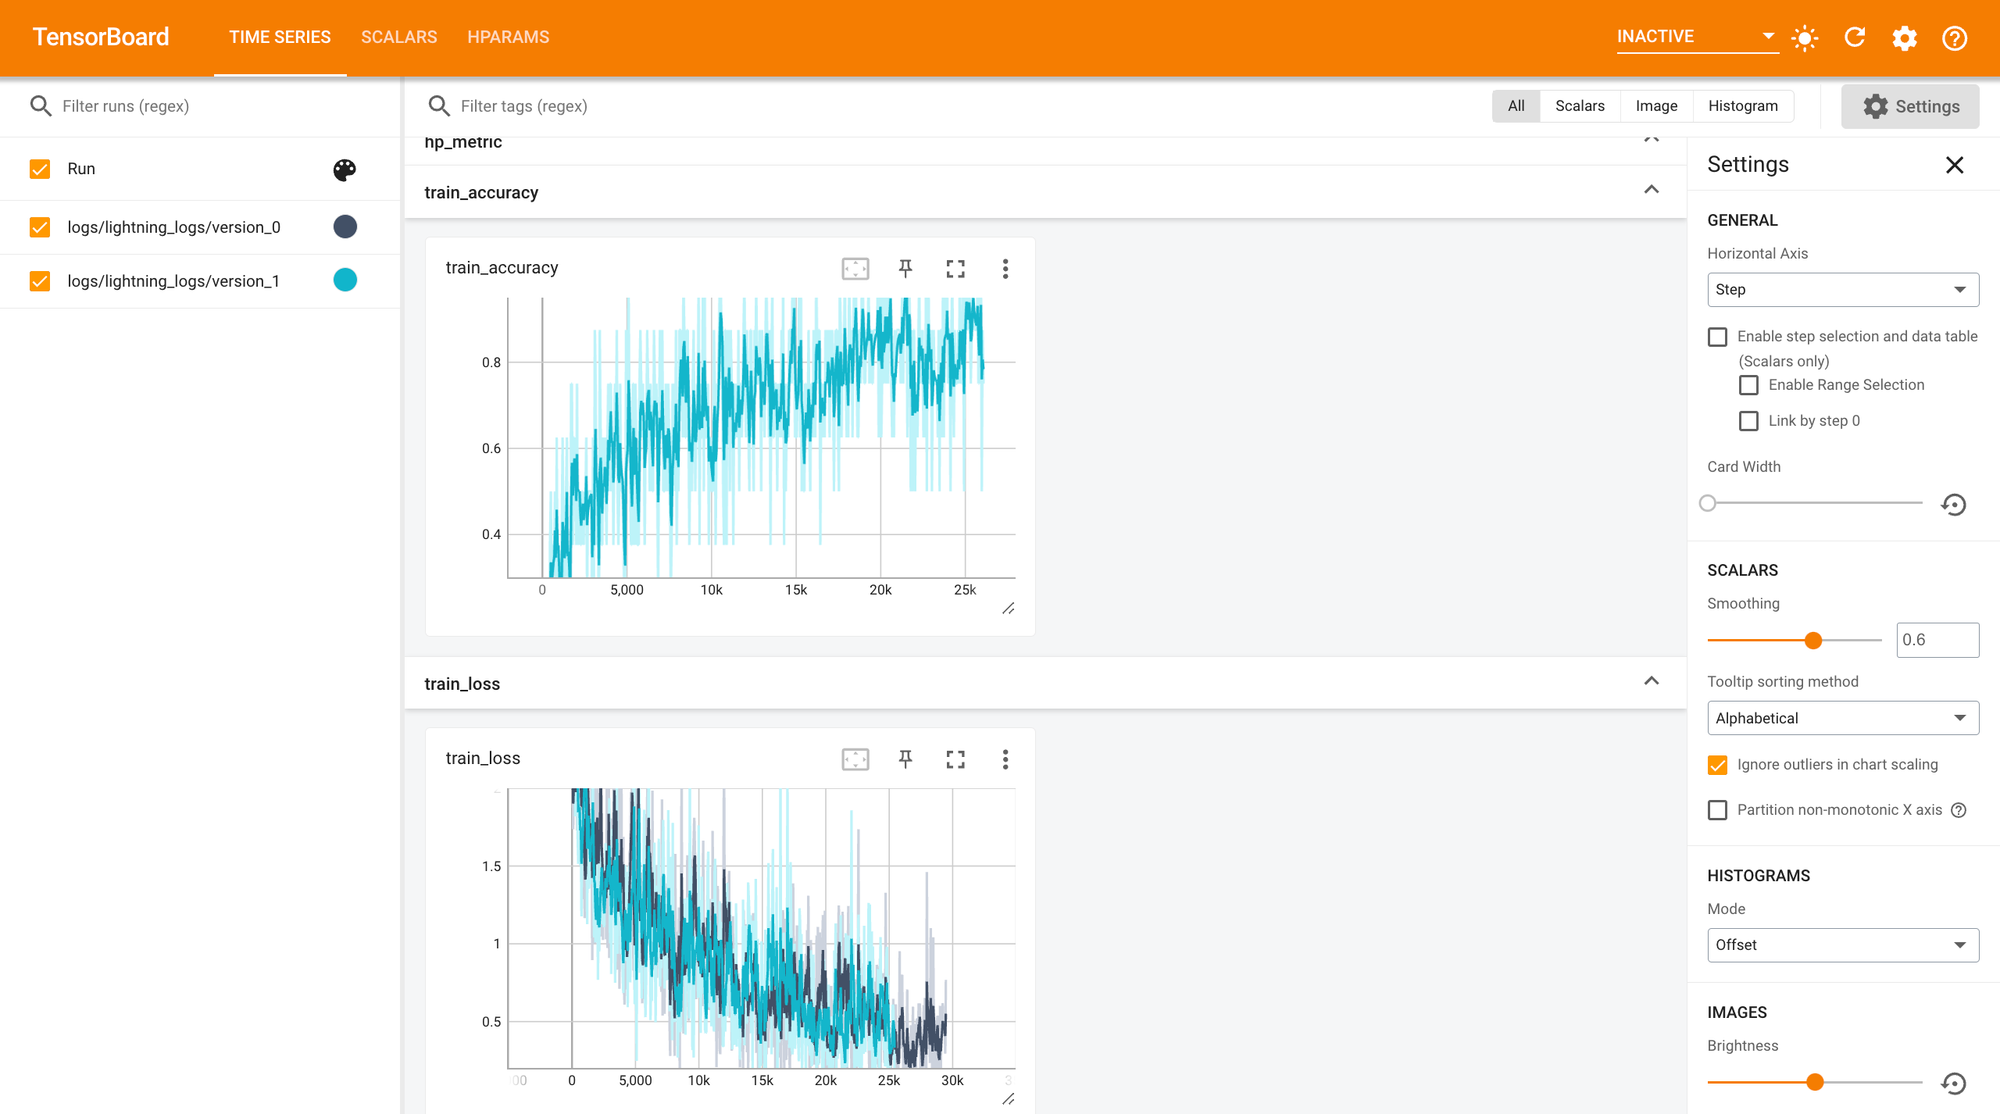
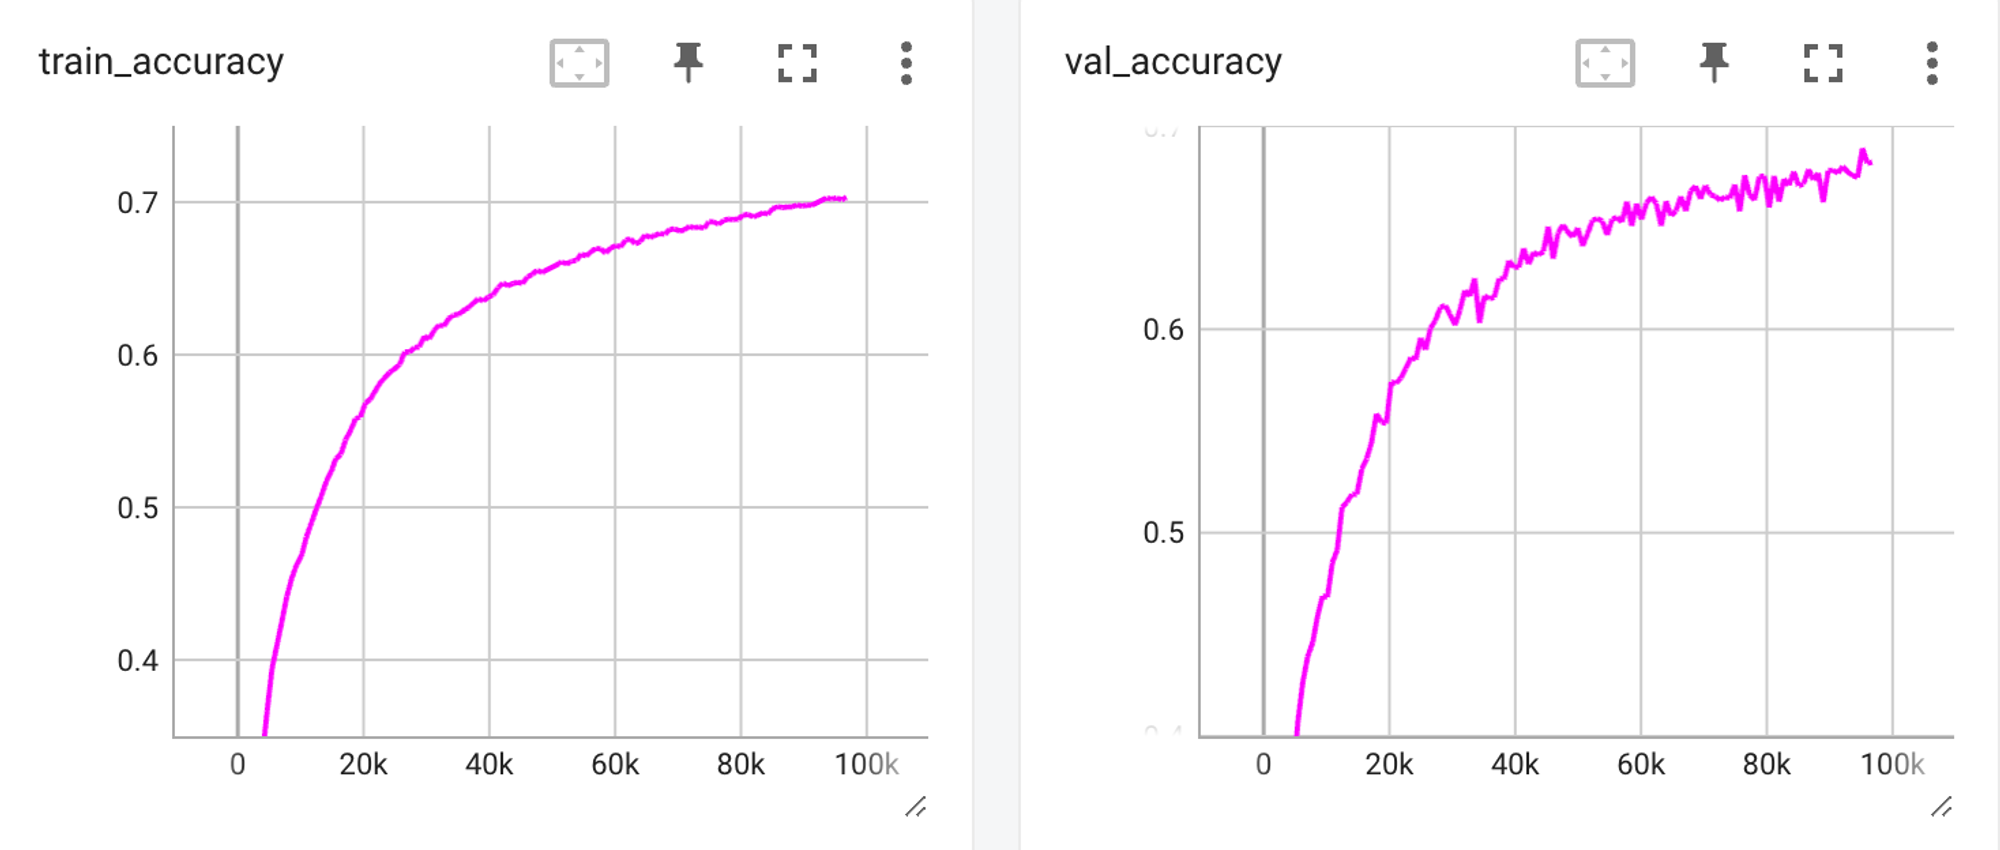
You can check the training and validation accuracy curve from the Tensorboard UI to check if there is any overfitting issue.
Once the training is finished, you can export the model and deploy it in production or submit it to an evaluation suite like Kaggle. You can adapt this code to train a much larger model on a large dataset as well. The codes are available here, feel free to give it a try, and use your favorite logger, callback, or trainer flag.
Conclusion
PyTorch Lightning streamlines the entire training and evaluation process by eliminating boilerplate code used for organizing the training code and scaling large models. It offers 35 training flags to facilitate improved debugging, monitoring, and scaling.
For complete beginners, I highly recommend enrolling in the Deep Learning Fundamentals course. This comprehensive course covers a wide range of topics, starting from the basics of machine learning and deep learning, to utilizing PyTorch for tasks like computer vision, natural language processing, and handling large language models (LLMs).
Additionally, you can delve deeper into PyTorch Lightning by exploring our documentation, which is divided into different levels of expertise.
Join our Discord community to ask questions and discuss ideas with the Lightning AI community. 💜