Key takeaways
Train Scikit-learn models on the cloud.The scale of machine learning datasets can often become large enough that migrating to a cloud provider for training, storing checkpoints, and logs becomes necessary. Making this migration, however, brings with it a host of attendant cloud infrastructure overhead that can be new to (and difficult for!) machine learning engineering teams.
In this blog post, we’ll show you how to train a Scikit-learn model with the Lightning framework. Then, we’ll explore how you can migrate your existing training script to train with Lightning.
Building a Scikit-learn training component
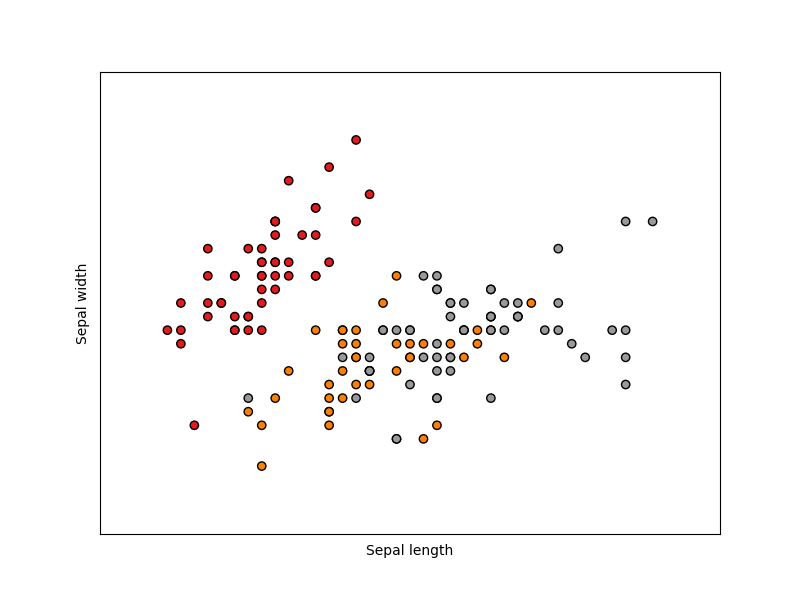
We’ll use the Iris flower dataset composed of three kinds of irises with different sepal and petal lengths. The chart below shows the distribution of flowers by their sepal width and height. The three color dots represent the category of Iris plants.

Distribution of Iris flower dataset. Source: Scikit-Learn
Scikit-learn already offers a convenient prebuilt function to load the iris dataset. For this tutorial, we’ll load the data using Scikit-learn and train a decision tree classifier.
Below is a simple code example for loading and using the dataset to train a decision tree classification model without Lightning. While this is the method in which Scikit-learn is typically used, combining it with cloud services for large datasets or deployment can be difficult.
from sklearn.datasets import load_iris
from sklearn import tree
from sklearn.model_selection import train_test_split
# Load the iris dataset
iris = load_iris()
X, y = iris.data, iris.target
# Split the dataset into training and test set
X_train, X_test, y_train, y_test = train_test_split(X, y)
# initialize a Decision tree model
clf = tree.DecisionTreeClassifier()
# train the model
clf = clf.fit(X_train, y_train)
# check accuracy
print(f"train accuracy: {clf.score(X_train, y_train)}")
print(f"test accuracy: {clf.score(X_test, y_test)}")
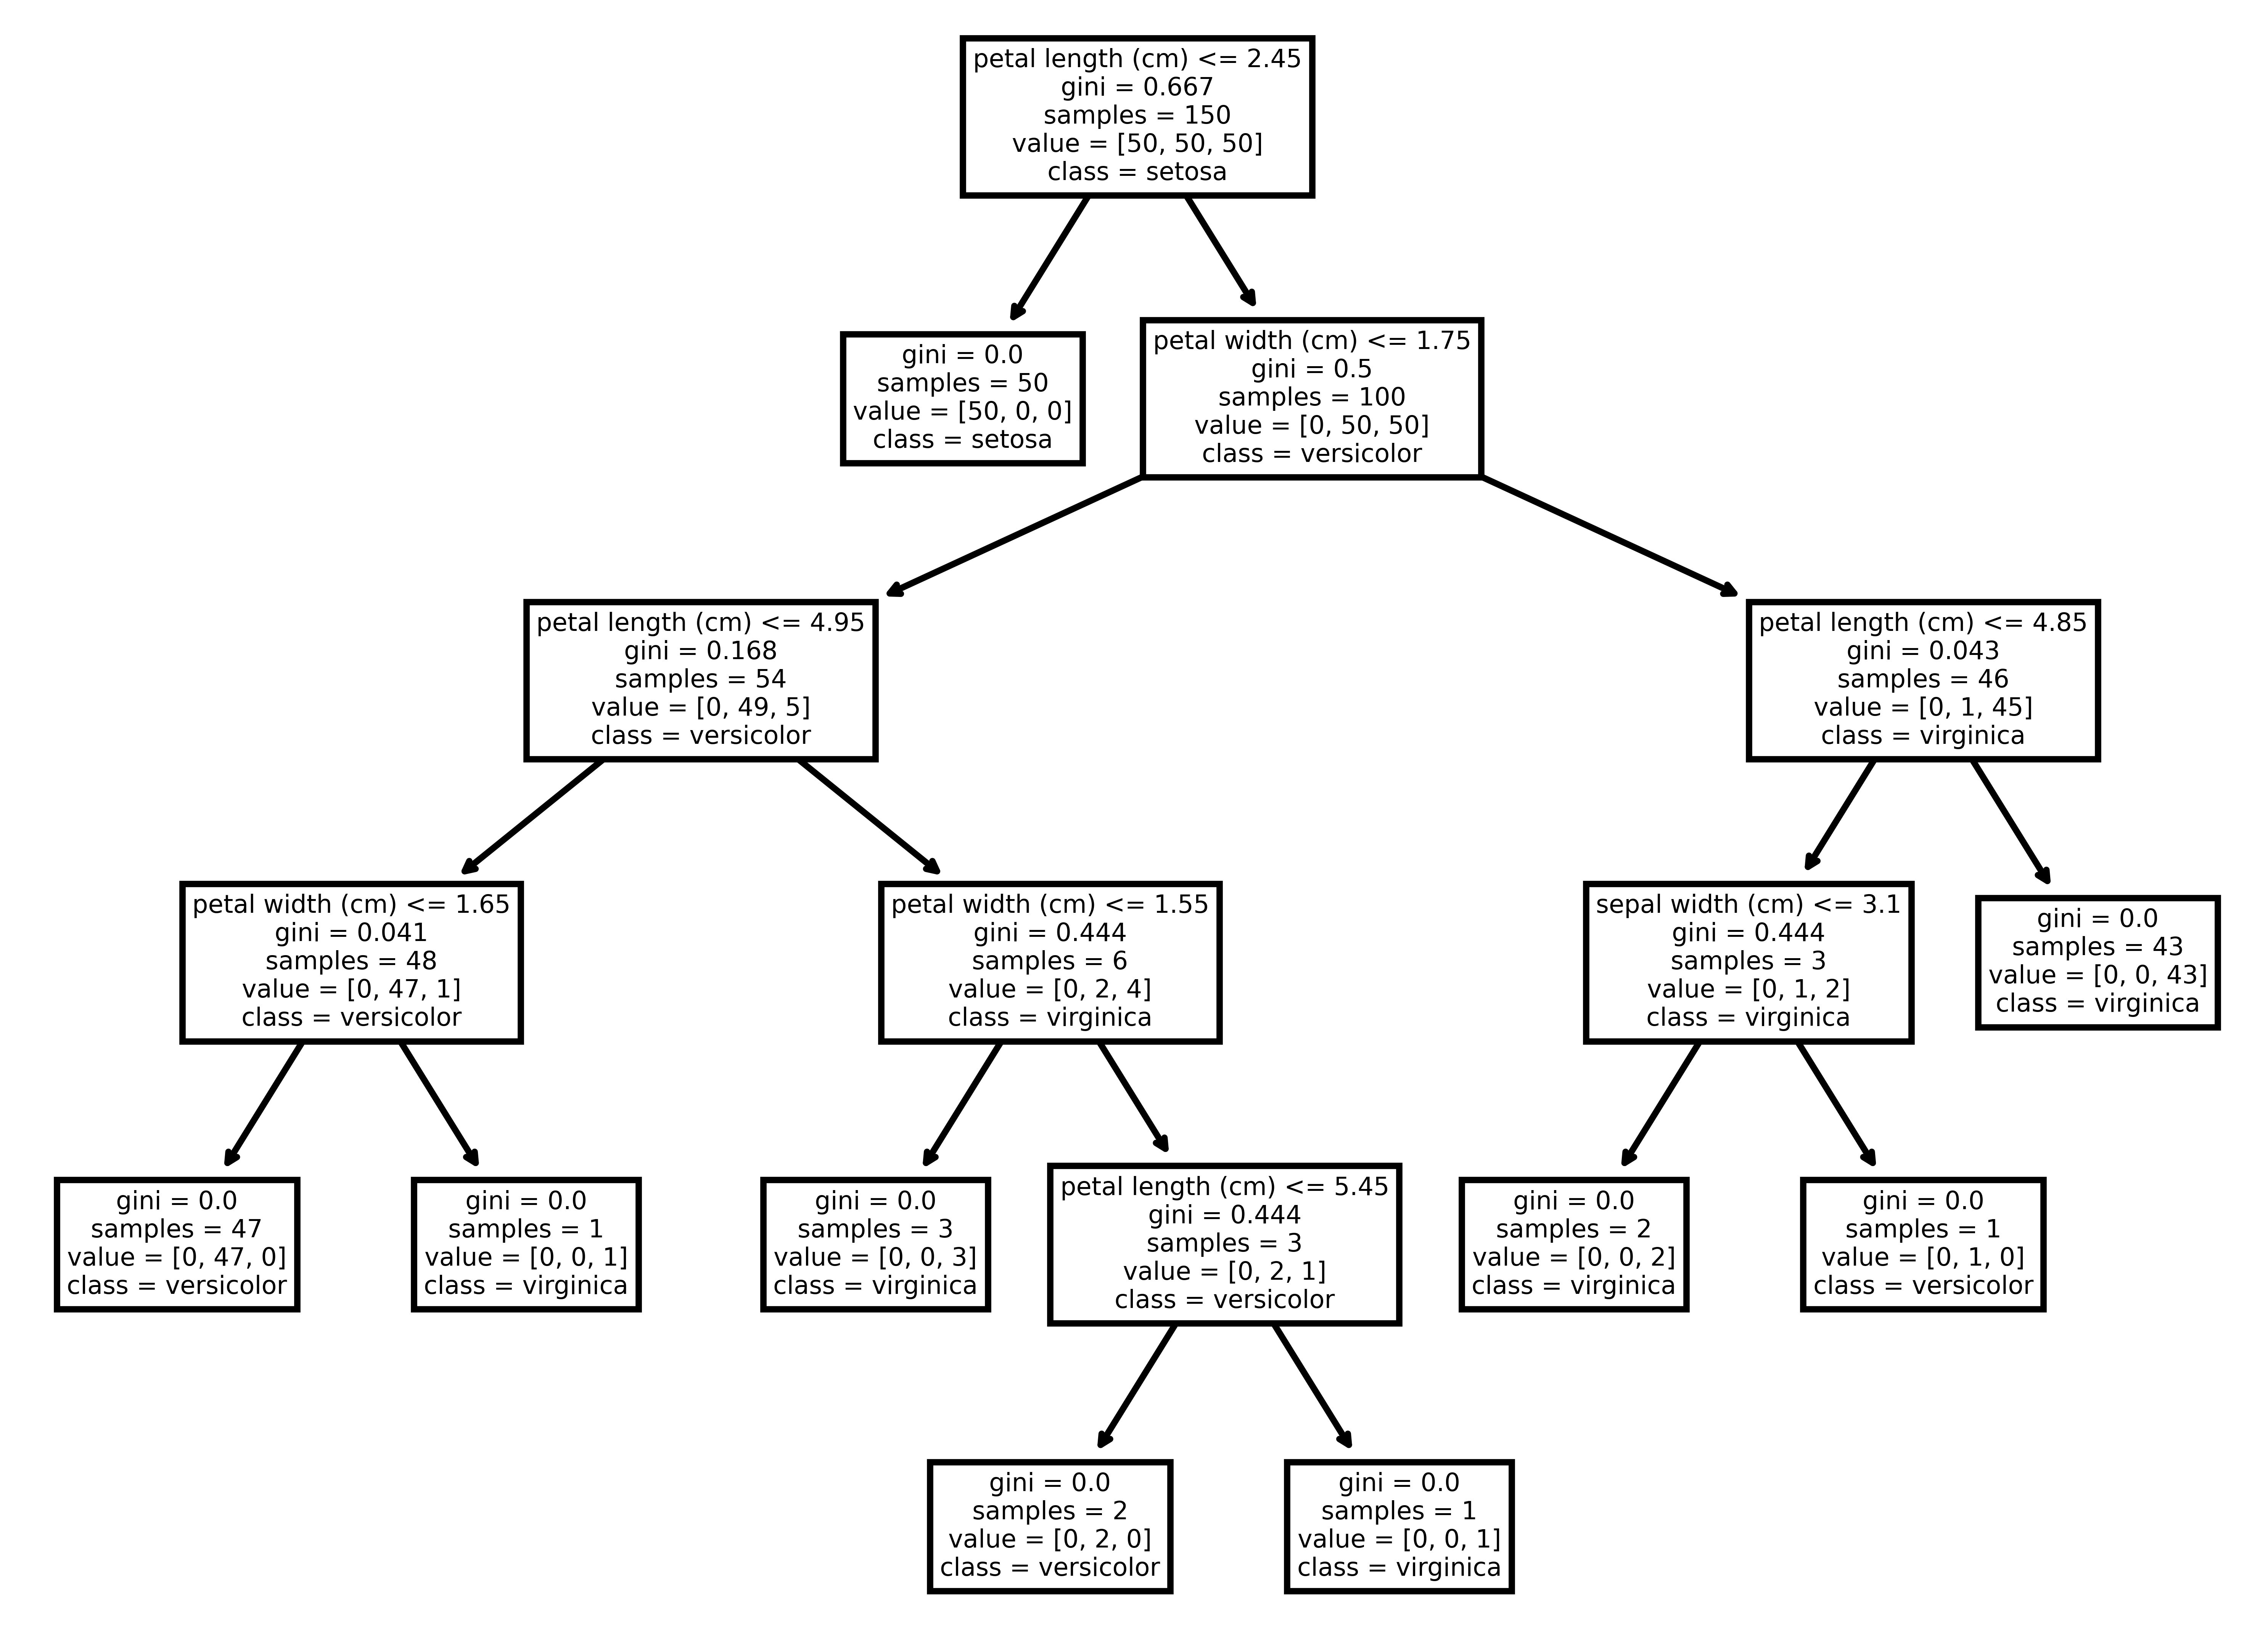
We can also plot our decision tree to visualize how the model actually makes a decision during inference. In order to plot the tree, we use the plot_tree function of the tree module. We pass our trained model to the function along with feature names (petal and sepal sizes) and class names (type of the iris plant):
from sklearn import tree
import matplotlib.pyplot as plt
tree.plot_tree(clf, feature_names=iris.feature_names, class_names=iris.target_names)
plt.show()
Below, we can see the visualization of the decision tree:

Visualization of the Decision Tree
Next, we’ll show you how to wrap that simple code into a Lightning component that will run our training job. To run a long-running task like downloading a dataset or training a machine learning model, we use LightningWork.
First, create a class SKLearnTraining that inherits LightningWork and defines the run method where you will implement all of the necessary steps for training your model. You can also configure hardware settings like CPU, RAM, and disk size using the CloudCompute API.
# !pip install -U scikit-learn
import lightning as L
from lightning.app.storage import Drive
from sklearn.datasets import load_iris
from sklearn import tree
from joblib import dump, load
class SKLearnTraining(L.LightningWork):
def __init__(self):
# we use CloudCompute API to configure the machine-related config
# create a CPU machine with 10 GB disk size
super().__init__(cloud_compute=L.CloudCompute("cpu", disk_size=10))
# cloud persistable storage for model checkpoint
self.model_storage = Drive("lit://checkpoints")
def run(self):
# Step 1
# Download the dataset
iris = load_iris()
X, y = iris.data, iris.target
# Split the dataset into training and test set
X_train, X_test, y_train, y_test = train_test_split(X, y)
# Step 2
# Intialize the model
clf = tree.DecisionTreeClassifier()
# Step 3
# Train the model
clf = clf.fit(X_train, y_train)
# check accuracy
print(f"train accuracy: {clf.score(X_train, y_train)}")
print(f"test accuracy: {clf.score(X_test, y_test)}")
# Step 4
# Save the model
dump(clf, 'model.joblib')
self.model_storage.put("model.joblib")
print("model trained and saved successfully")
component = SKLearnTraining()
app = L.LightningApp(component)
In order to deploy or fine-tune this model in the future, first you need to save it. Lightning provides the Drive API, a central place for components to share data. You can store your model in the drive and easily access it from a different component in your workflow like a deployment pipeline. You can also manually download the model from your Lightning App dashboard.
To run this application, first you have to create an app object using LightningApp and save the module as app.py.
Finally, to run this training process on the cloud, simply run lightning run app app.py --cloud. To run this process locally, simply drop the --cloud flag.
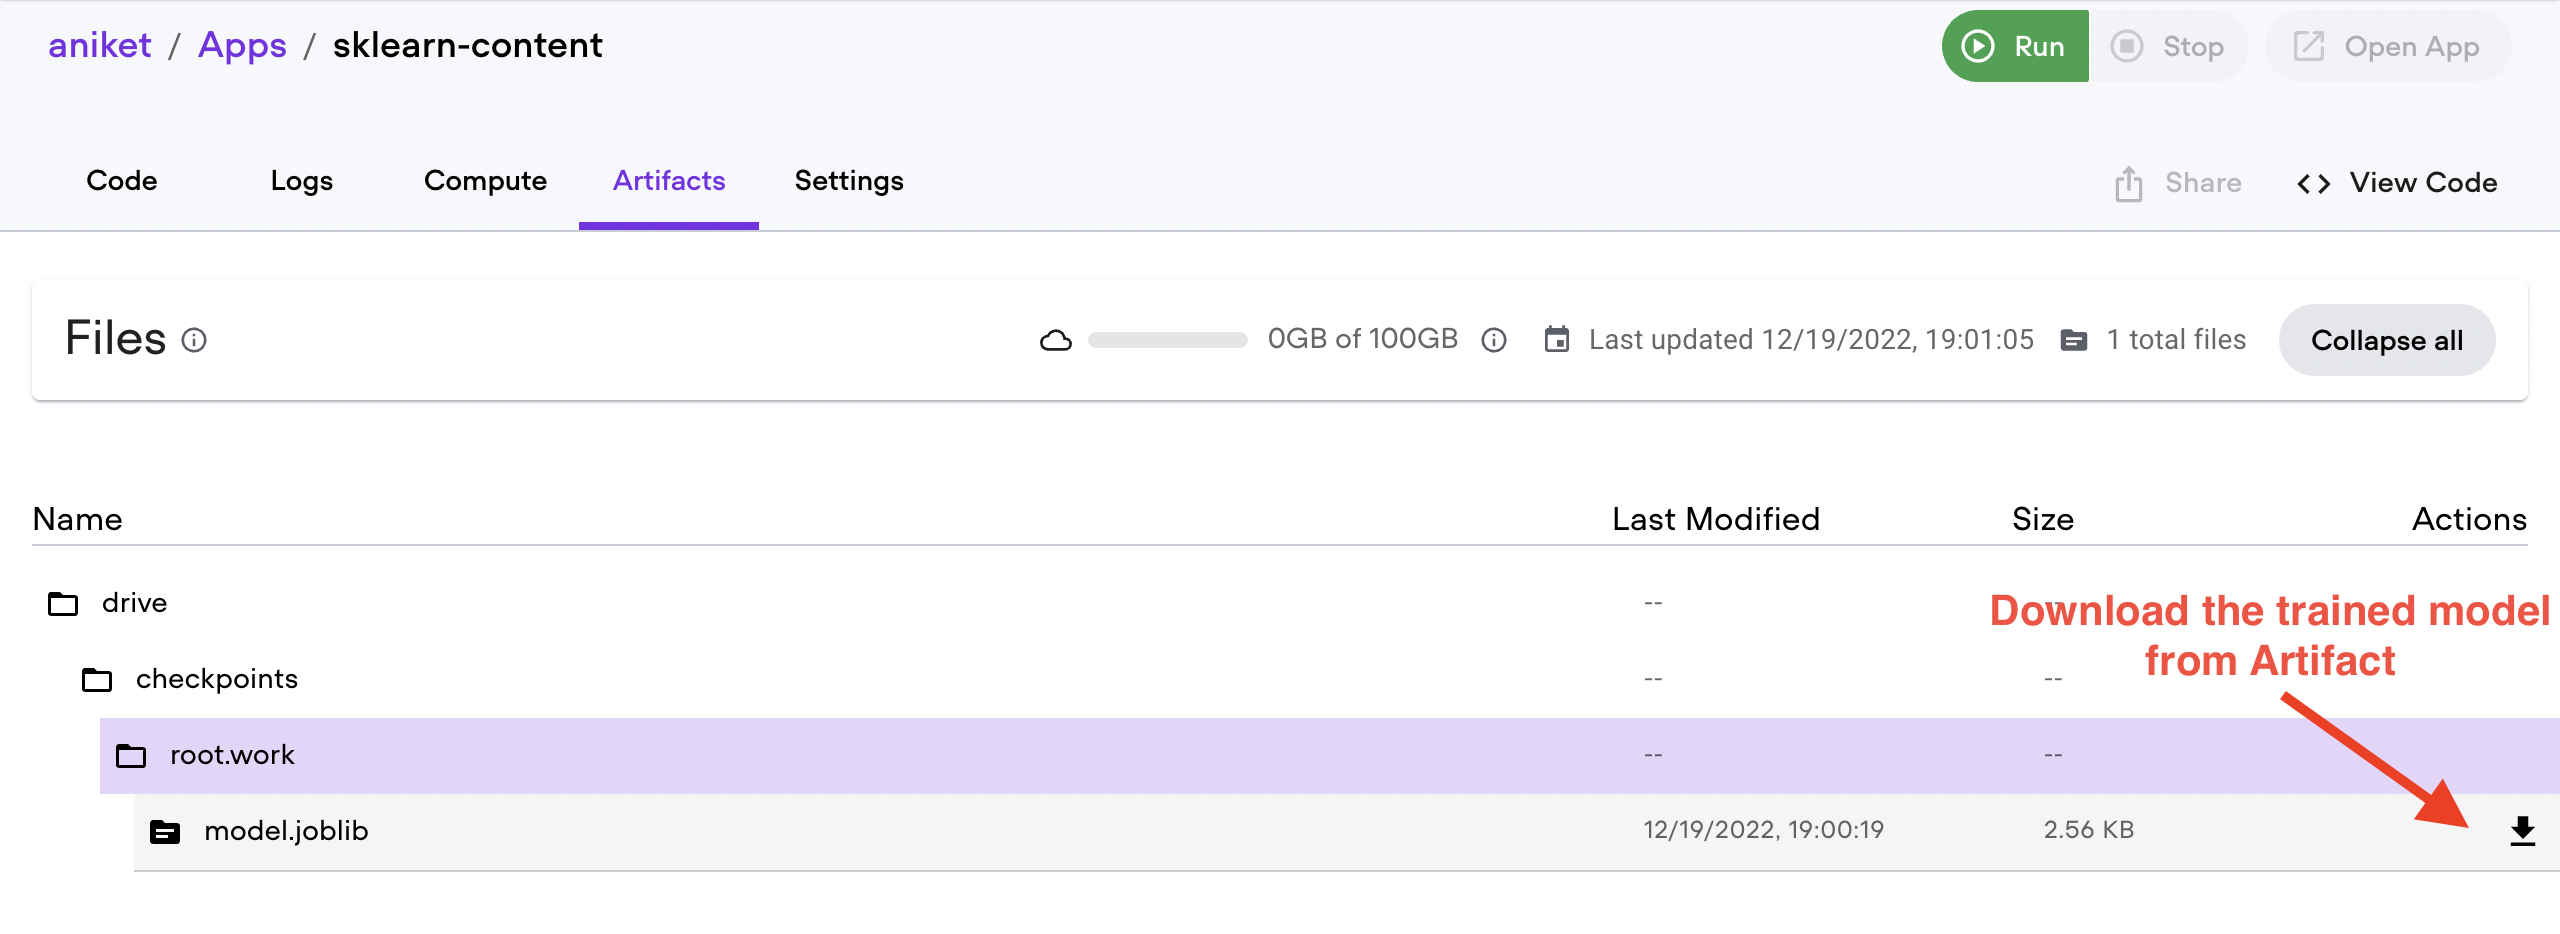
You can now monitor your training progress logs and check the model checkpoint directly from your Lightning AI account. Begin by viewing your Lightning Apps, select the App that you’ve launched, and navigate through your code, logs, and artifacts. You can also download your saved model from the Artifacts menu, as pictured below.

Lightning AI Web Dashboard
With just a few lines of code, Lightning makes it easy to train a model on the cloud, configure your hardware, and enable your model to persist for later use.
Now that your model is trained, you can also do much more, like:
- Consume the trained model for deployment
- Schedule a training job
- Trigger the training job based on a condition, like a new data stream
- Perform hyperparameter optimization on the cloud
Migrate existing training to Lightning
If you already have a Scikit-learn training process on your local system (or another cloud), all you need to do to migrate to Lightning is create a LightningWork class and define the run method.
You can define all of the configs in the __init__ method and move the training code to the run method.
Signing up for a Lightning account is free! Every month, you get 3 free credits delivered directly to your account that you can use to train models and run applications on the cloud.
Get started with Lightning!