Key Takeaways
How to use PyTorch 2.0 and train a compiled model with PyTorch Lightning 2.0.Find the full code used in this tutorial here.
Higher Performance and as Pythonic as ever
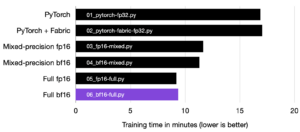
PyTorch 2.0 aims to achieve higher levels of performance with torch.compile. This is done by taking advantage of the latest packages that perform optimizations at the compiler level. By using torch.compile, you can train your model 51% faster on average with AMP on an NVIDIA A100 GPU, according to an experiment with 163 open-source models.
PyTorch 2.x aims to push the performance with model compilation further while maintaining its Pythonic nature and backward compatibility.
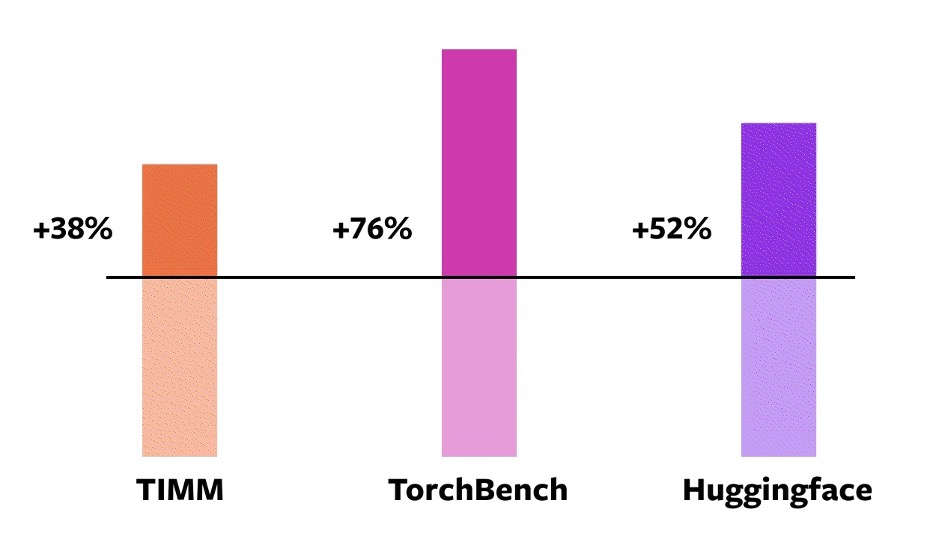
Speedups for torch.compile against eager mode on an NVIDIA A100 GPU. Source: PyTorch
Lightning ❤️ PyTorch 2.x
“PyTorch 2.0 embodies the future of deep learning frameworks. The possibility to capture a PyTorch program with effectively no user intervention and get massive on-device speedups and program manipulation out of the box unlocks a whole new dimension for AI developers.” – Luca Antiga, CTO Lightning AI
This week, Lightning also launched version 2.0 of PyTorch Lightning, that is compatible with PyTorch 2.x. This version supports model compilation out of the box:
import lightning as L
import torch
class LitModel(L.LightningModule):
...
model = LitModel()
compiled_model = torch.compile(model) # compiles the model and *step (training/validation/prediction)
trainer = L.Trainer()
trainer.fit(compiled_model)
Is PyTorch compile fast?
To confirm this, let’s compile a model and run some benchmarks. We’ll use a ResNet-50 and a ResNet-152 model from TorchVision, and pass a tensor of size 1x3x224x224 10 times.
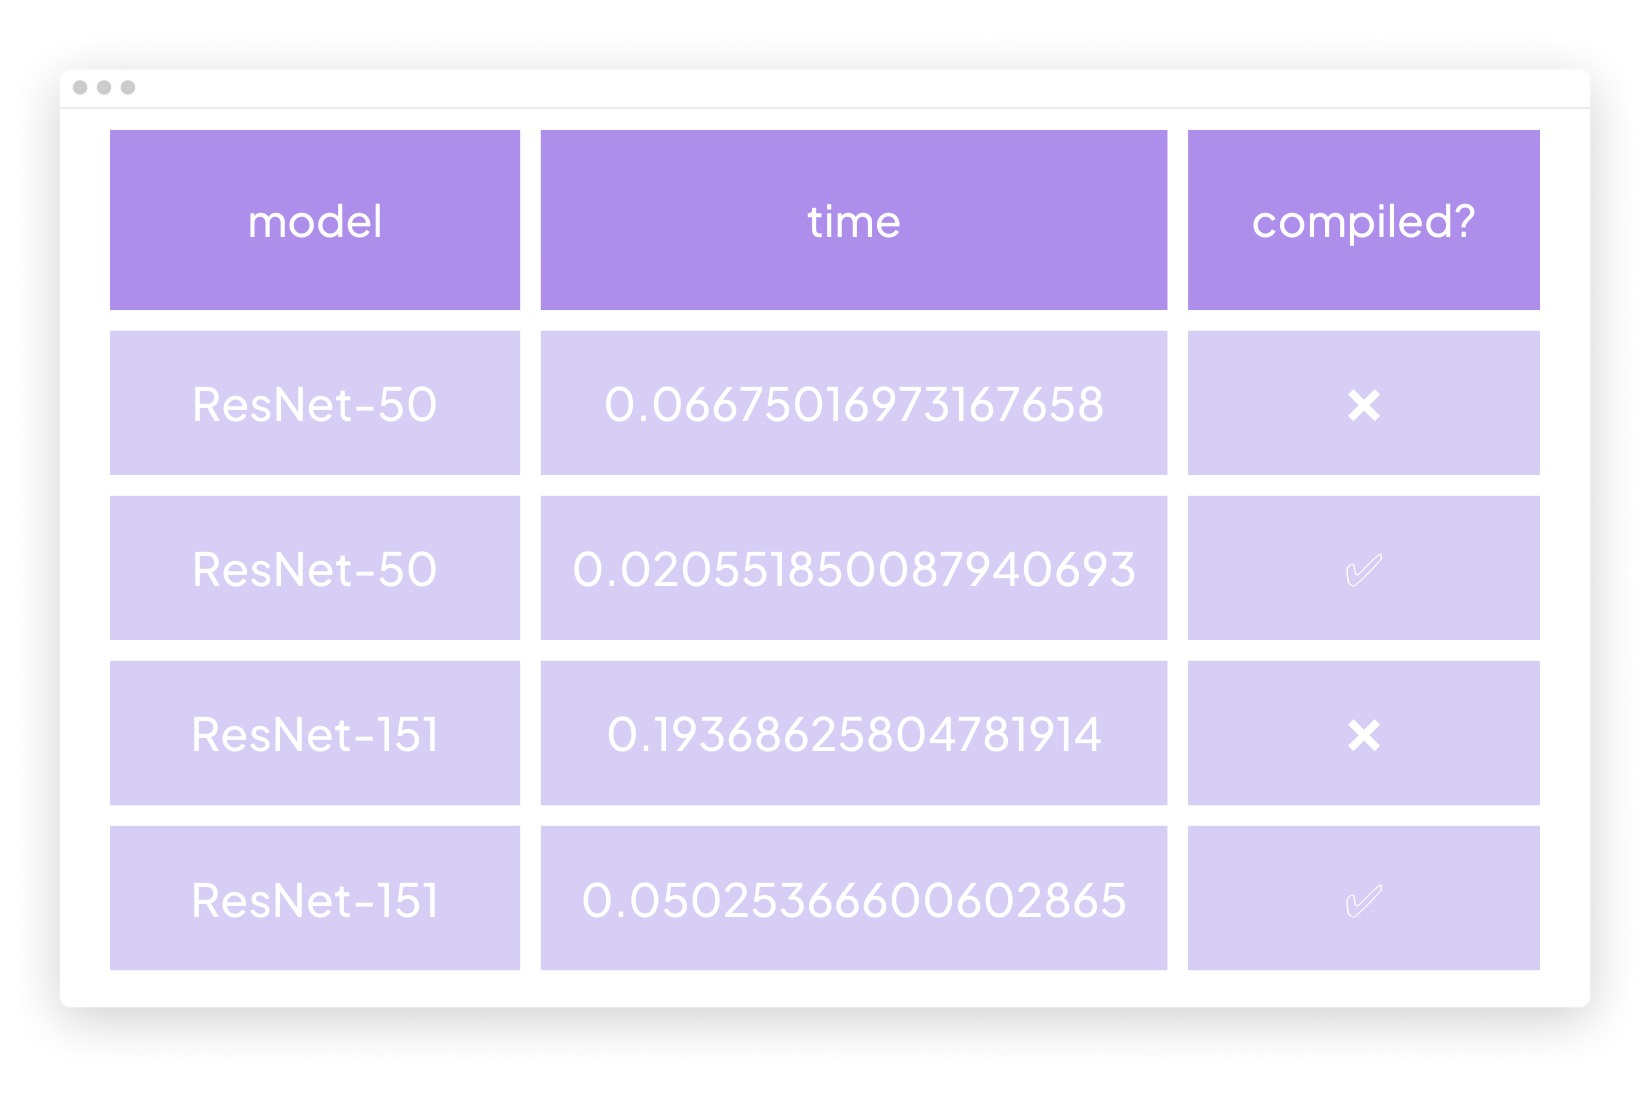
We observe that ResNet-151 had a performance gain of 74% and ResNet-50 gained 69.2%.
What you can do with just a single line of change in your codebase is really impressive! 🤯 Here is the code if you want to reproduce this.
Training a Compiled PyTorch LightningModule
We’ll train the ResNet model using the CIFAR-10 dataset to show how you can train a model with PyTorch 2.x compile feature. You can take this tutorial as an inspiration to build and train further compiled models with high performance.
We’ll take the following steps:
- Load dataset
- Write training code using LightningModule
- Compile the LightningModule
- Train the model
Load CIFAR-10 dataset
First, let’s use torchvision to load the CIFAR-10 dataset and build training and validation dataloaders:
import torch.nn.functional as F
import torchvision
import torchvision.transforms as transforms
def load_data():
transform = transforms.Compose(
[transforms.ToTensor(), transforms.Normalize((0.5, 0.5, 0.5), (0.5, 0.5, 0.5))]
)
batch_size = 32
train_set = torchvision.datasets.CIFAR10(
root="~/data", train=True, download=True, transform=transform
)
train_loader = torch.utils.data.DataLoader(
train_set, batch_size=batch_size, shuffle=True, num_workers=4
)
val_set = torchvision.datasets.CIFAR10(
root="~/data", train=False, download=True, transform=transform
)
val_loader = torch.utils.data.DataLoader(
val_set, batch_size=batch_size, shuffle=False, num_workers=4
)
return train_loader, val_loader
Organize the Training Code with LightningModule
To train a ResNet18 model, we create a LightningModule and instantiate the model in the __init__ method. We then define the training and validation steps and configure our optimizer. Lightning automatically handles moving the data to the correct devices, calling the optimizer update, and zeroing out the gradients.
# pip install lightning timm
import lightning as L
from timm import create_model
class LitModel(L.LightningModule):
def __init__(self):
super().__init__()
self.model = create_model("resnet18", num_classes=10)
self.criterion = nn.CrossEntropyLoss()
def forward(self, x):
return self.model(x)
def training_step(self, batch, batch_idx):
x, y = batch
logits = self(x)
loss = self.criterion(logits, y)
return loss
def validation_step(self, batch, batch_idx):
x, y = batch
logits = self(x)
loss = self.criterion(logits, y)
return loss
def configure_optimizers(self):
return torch.optim.Adam(self.model.parameters(), lr=0.001)
Compile our code
To compile the LightningModule, you simply call torch.compile. This will automatically compile the model and its *_steps (training/validation). The torch.compile function has several arguments, but in this tutorial, we will only use the mode argument and leave the rest as default. To learn more about these arguments, visit the official docs.
There are three available modes: default, reduce-overhead, and max-autotune. During the benchmarks above, we tried both default and reduce-overhead and found that reduce-overhead leads to higher performance.
import torch
compiled_model = torch.compile(LitModel(), mode="reduce-overhead")
Train the compiled model
trainer = L.Trainer(max_epochs=1)
trainer.fit(model, train_loader)
The Lightning 2.0 Trainer automatically selects the appropriate accelerator (MPS/Cuda/TPUs) and the number of devices for you. You can provide additional flags to configure where and how to save your checkpoints, log metrics, and more. For more information about the Trainer, check out our docs.
If you are undertaking complex tasks like reinforcement learning or training an LLM and need more control over the training loop while leveraging PyTorch Lightning APIs for accelerators and distributed strategies then check out Fabric: a fast and lightweight way to scale PyTorch models.