Takeaways
Learn how to gain back research time by leveraging PyTorch Lightning for over 100 inbuilt methods, hooks, and flags that save you engineering hours on heavy lifts like distributed training in multi-GPU and multi-node environments.What is Lightning?
The framework known as Lightning is PyTorch Lightning. Or perhaps it is better to simply say that – Lightning contains PyTorch Lightning. This changed in mid-2022 when PyTorch Lightning was unified with Lightning Apps under a single framework and rebranded as Lightning. As of early 2023, the Lightning repository also includes Lightning Fabric – a lightweight way to scale PyTorch models while returning control over the training loop back to the engineer.
Neither PyTorch Lightning or Lightning Fabric are meant to replace PyTorch. Meaning we still need to implement algorithms with PyTorch. Lightning’s PyTorch Lightning and Fabric help us to manage the training process of those PyTorch implementations. Code examples shared later in this post will clarify what this relationship between PyTorch and Lightning looks like.
Building with Lightning
Now that Lightning AI’s frameworks are unified into a single repository and framework known as Lightning, this means that when researchers install Lightning, each of PyTorch Lightning, Lightning Apps, and Lightning Fabric are installed, along with our metrics library – TorchMetrics.
Researchers, ML Engineers, and Data Scientists also have the option to install each framework individually with one of:
pip install pytorch-lightning,pip install lightning-apps, orpip install lightning-fabric
The key takeaway here is that Lightning is still the trustworthy PyTorch Lightning framework that allows you to easily scale your models without having to write your own distributed training code or write your own training and evaluation loops – winning you back precious time that can be allocated back to research.
Why Lightning
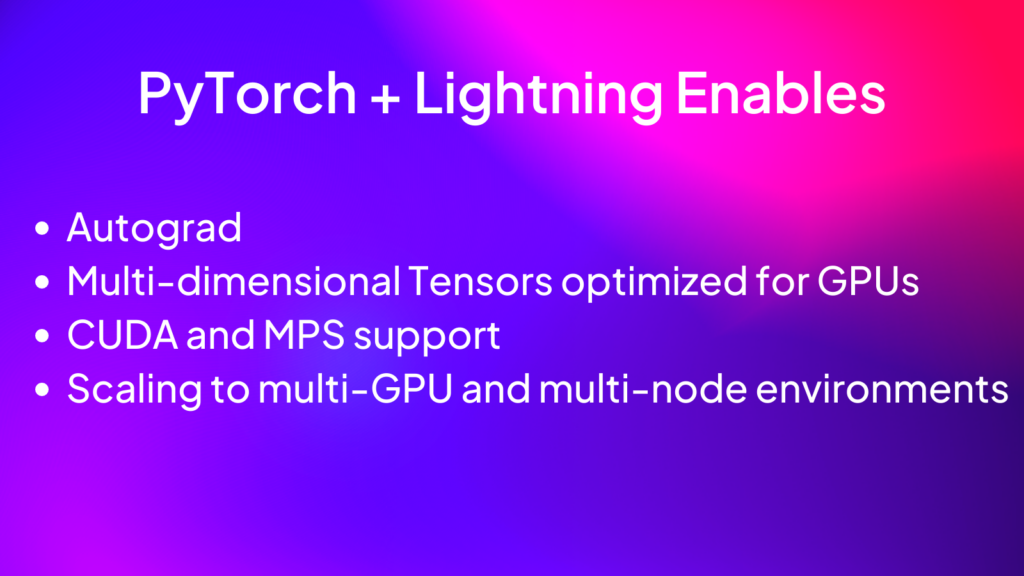
Lightning AI saves you time by devoting engineering hours to maintaining Lightning and tackling the tasks you shouldn’t have to handle as a domain researcher, like distributed training on CUDA devices. PyTorch Lightning and Lightning Fabric each enable researchers to focus on the research aspect of their codebase instead of implementing custom methods and properties, callbacks, or plugins on their own.
How does this compare to NumPy and Pandas? Using PyTorch instead of some combination of NumPy, Pandas, and Python standard means that you won’t have to write your own autograd engine. Using PyTorch Lightning or Lightning Fabric with PyTorch means you won’t have to write your own distributed training code with Python and possibly CUDA C++.
Using Lightning with PyTorch
What does “Using Lightning with PyTorch” mean exactly? It means that researchers and engineers can focus on writing their model as Child Modules in PyTorch before writing a custom LightningModule or adding Lightning Fabric into a vanilla PyTorch training loop. A Child Module is the algorithm that has been implemented in PyTorch and will be trained with PyTorch Lightning or Lightning Fabric. A high-level example of this concept is shown below in the code block.
import lightning as L
import torch
from torch import nn
class MyCustomTorchModule(nn.Module):
def __init__(self, in_features: int, num_classes: int):
super().__init__()
linear1 = nn.Linear(
in_features=in_features,
out_features=in_features,
)
relu = nn.ReLU()
linear2 = nn.Linear(
in_features=in_features,
out_features=num_classes,
)
self.sequential = nn.Sequential([linear1, relu, linear2])
def forward(self, x):
return self.sequential(x)
class MyCustomLightningModule(L.LightningModule):
def __init__(self, in_features: int, num_classes: int):
super().__init__()
self.model = MyCustomTorchModule(in_features=in_features, num_classes=num_classes)
def forward(self, x: torch.Tensor):
return self.model(x)
In the example repo – Lightning Quant, an MLP is provided as a Child Module in lightning_quant.models.mlp. Lightning Quant is a Deep Learning library for training algorithmic trading agents with PyTorch Lightning and Lightning Fabric. Data provided in the repo allows for the reproducibility of the examples shown in this post.
Lightning Quant’s MLP is also shown below – we’ll stick with MLP throughout this post as the architecture is easy to understand and does not require much explanation. Note that MLP inherits from PyTorch’s nn.Module, making MLP a subclass of nn.Module and allowing MLP to make use of methods available to nn.Module through this inheritance.
ElasticNet Pseudocode
class LinearModel(nn.Module):
def __init__(self, in_features: int, num_classes: int):
super().__init__()
self.linear = nn.Linear(
in_features=in_features,
out_features=num_classes,
)
def forward(self, x):
return self.linear(x)
class ElasticNet(L.LightningModule):
def __init__(self, in_features: int, num_classes: int):
super().__init__()
self.model = LinearModel(in_features=in_features, num_classes=num_classes)
def forward(self, x: torch.Tensor):
return self.model(x)
ElasticNet Code
import lightning as L
import torch
import torch.nn.functional as F
from torch import nn, optim
from torchmetrics.functional import accuracy
from lightning_quant.core.metrics import regularization
class ElasticNet(L.LightningModule):
"""Logistic Regression with L1 and L2 Regularization"""
def __init__(
self,
in_features: int,
num_classes: int,
bias: bool = False,
lr: float = 0.001,
l1_strength: float = 0.1,
l2_strength: float = 0.1,
optimizer="Adam",
accuracy_task: str = "multiclass",
dtype="float32",
):
super().__init__()
if "32" in dtype and torch.cuda.is_available():
torch.set_float32_matmul_precision("medium")
self.lr = lr
self.l1_strength = l1_strength
self.l2_strength = l2_strength
self.accuracy_task = accuracy_task
self.num_classes = num_classes
self._dtype = getattr(torch, dtype)
self.optimizer = getattr(optim, optimizer)
self.model = nn.Linear(
in_features=in_features,
out_features=num_classes,
bias=bias,
dtype=self._dtype,
)
self.save_hyperparameters()
def forward(self, x: torch.Tensor):
return self.model(x.to(self._dtype))
def training_step(self, batch):
return self.common_step(batch, "training")
def test_step(self, batch, *args):
self.common_step(batch, "test")
def validation_step(self, batch, *args):
self.common_step(batch, "val")
def common_step(self, batch, stage):
"""consolidates common code for train, test, and validation steps"""
x, y = batch
x = x.to(self._dtype)
y = y.to(torch.long)
y_hat = self.model(x)
criterion = F.cross_entropy(y_hat, y)
loss = regularization(
self.model,
criterion,
self.l1_strength,
self.l2_strength,
)
if stage == "training":
self.log(f"{stage}_loss", loss)
return loss
if stage in ["val", "test"]:
acc = accuracy(
y_hat.argmax(dim=-1),
y,
task=self.accuracy_task,
num_classes=self.num_classes,
)
self.log(f"{stage}_acc", acc)
self.log(f"{stage}_loss", loss)
def predict_step(self, batch, batch_idx, dataloader_idx=0):
x, y = batch
y_hat = self(x)
y_hat = y_hat.argmax(dim=-1)
return y_hat
def configure_optimizers(self):
"""configures the ``torch.optim`` used in training loop"""
optimizer = self.optimizer(
self.parameters(),
lr=self.lr,
)
return optimizer
After defining the Child Module as MLP, we need to implement either a LightningModule or a custom PyTorch training loop with Lightning Fabric. ElasticNetMLP, the accompanying LightningModule for MLP is shown below, and you will notice training_step, test_step, validation_step, predict_step, and configure_optimizer . These methods are all examples of ways Lightning has extended nn.Module to provide researchers with easy to implement training and evaluation loops in Lightning.Trainer.
Aside from these 5 methods, LightningModule provides researchers with 16 additional methods and 36 model hooks. Lightning Fabric, being more lightweight, provides researchers with 8 arguments to configure a model’s settings like precision and the distributed training strategy and 17 methods to assist in the training process.
In the example below, we will notice that ElasticNetMLP inherits from LightningModule – meaning that ElasticNetMLP is now a subclass of LightningModule and can be used in conjunction with Lightning.Trainer to train the MLP. In order to train MLP, we first import it into the Python module, and then assign it as self.model in ElasticNetMLP . Doing so makes MLP accessible in the other class methods – notably the training_step, test_step, validation_step, and predict_step methods.
ElasticNetMLP Pseudocode
class MLP(nn.Module):
def __init__(self, in_features: int, num_classes: int):
super().__init__()
linear1 = nn.Linear(
in_features=in_features,
out_features=in_features,
)
relu = nn.ReLU()
linear2 = nn.Linear(
in_features=in_features,
out_features=num_classes,
)
self.sequential = nn.Sequential([linear1, relu, linear2])
def forward(self, x):
return self.sequential(x)
class ElasticNetMLP(L.LightningModule):
def __init__(self, in_features: int, num_classes: int):
super().__init__()
self.model = MLP(in_features=in_features, num_classes=num_classes)
def forward(self, x: torch.Tensor):
return self.model(x)
ElasticNetMLP Code
import lightning as L
import torch
import torch.nn.functional as F
from torch import nn, optim
from torchmetrics.functional import accuracy
from lightning_quant.core.metrics import regularization
class ElasticNetMLP(L.LightningModule):
"""Logistic Regression with L1 and L2 Regularization"""
def __init__(
self,
in_features: int,
num_classes: int,
bias: bool = False,
lr: float = 0.001,
l1_strength: float = 0.5,
l2_strength: float = 0.5,
optimizer="Adam",
accuracy_task: str = "multiclass",
dtype="float32",
):
super().__init__()
self.lr = lr
self.l1_strength = l1_strength
self.l2_strength = l2_strength
self.accuracy_task = accuracy_task
self.num_classes = num_classes
self._dtype = getattr(torch, dtype)
self.optimizer = getattr(optim, optimizer)
self.model = MLP(
in_features=in_features,
num_classes=num_classes,
bias=bias,
dtype=self._dtype,
)
self.save_hyperparameters()
def forward(self, x: torch.Tensor):
return self.model(x)
def training_step(self, batch):
return self.common_step(batch, "training")
def test_step(self, batch, *args):
self.common_step(batch, "test")
def validation_step(self, batch, *args):
self.common_step(batch, "val")
def common_step(self, batch, stage):
x, y = batch
x = x.to(self._dtype)
y = y.to(torch.long)
y_hat = self(x)
criterion = F.cross_entropy(y_hat, y)
loss = regularization(
self.model,
criterion,
self.l1_strength,
self.l2_strength,
)
if stage == "training":
self.log(f"{stage}_loss", loss)
return loss
if stage in ["val", "test"]:
acc = accuracy(
y_hat.argmax(dim=-1),
y,
task=self.accuracy_task,
num_classes=self.num_classes,
)
self.log(f"{stage}_acc", acc)
self.log(f"{stage}_loss", loss)
def predict_step(self, batch, batch_idx, dataloader_idx=0):
x, y = batch
y_hat = self(x)
y_hat = y_hat.argmax(dim=-1)
return y_hat
def configure_optimizers(self):
optimizer = self.optimizer(
self.parameters(),
lr=self.lr,
)
return optimizer
What makes the example above so user-friendly is that PyTorch Lightning has established conventions on how we name certain class methods for the training loop. Meaning that Lightning.Trainer is going to call each of the above methods at an appropriate time during the training and eval loop. So, not only do we not have to write our own trainer when we use LightningModule in conjunction with Lightning.Trainer – we also don’t have to worry about naming conventions for class methods or class attributes. In this way, Lightning is a North Star for Deep Learning best practices and conventions.
Training with Lightning.Trainer and Lightning Fabric
Let’s remember that PyTorch Lightning and Lightning Fabric are not meant to replace PyTorch and instead are frameworks created by Lightning AI that enable a better training experience for domain researchers. A notable difference between PyTorch Lightning and Lightning Fabric is how researchers will implement a training loop. In PyTorch Lightning, we have Lightning.Trainer, which provides around 40 flags to assist in automating training loops – whereas the lightweight Fabric allows you to build your own trainer. You may be asking – why are there two ways to do this in Lightning, and what makes Fabric “lightweight”? We’ll cover that below with visual examples.
Lightning.Trainer
In the code block below, we have an example of a custom trainer built with Lightning.Trainer – one of the two Core API classes of PyTorch Lightning. While the code may look simple, as it is only 35 lines – it abstracts an entire framework that has taken since 2019 to build and is the result of contributions from several hundred international contributors.
If you’ve ever written your own training loops from scratch for statistical learning with NumPy, or with PyTorch for Deep Learning, then you’ll notice the immediate convenience of using Lightning.Trainer. If you haven’t, that is okay too – the ease of use of the Lightning.Trainer will become apparent as we write custom trainers with Lightning Fabric. This isn’t to say that Lightning Fabric is difficult to use, instead – we are acknowledging the trade-offs between a managed training loop in Lightning.Trainer and having nearly full control over the loop with Lightning Fabric.
import lightning as L
from lightning.pytorch import seed_everything
from lightning.pytorch.callbacks import ModelCheckpoint
from lightning.pytorch.loggers import Logger, TensorBoardLogger
from lightning.pytorch.profilers import Profiler
import torch
from typing import Any, Dict, List, Optional, Union
class QuantLightningTrainer(L.Trainer):
"""A custom Lightning.LightningTrainer"""
def __init__(
self,
logger: Optional[Logger] = None,
profiler: Optional[Profiler] = None,
callbacks: Optional[List] = [],
plugins: Optional[List] = [],
set_seed: bool = True,
seed: int = 42,
profiler_logs: Optional[str] = None,
tensorboard_logs: Optional[str] = None,
checkpoints_dir: Optional[str] = None,
**trainer_init_kwargs: Dict[str, Any]
) -> None:
if set_seed:
seed_everything(seed, workers=True)
super().__init__(
logger=logger,
profiler=profiler,
callbacks=callbacks, filename="model")],
plugins=plugins,
**trainer_init_kwargs
)
As for the custom Lightning.Trainer shown above – it is entirely possible to keep this out of a Python class object and instead run this from a script or in a Jupyter Notebook. The implementation as a custom class has more to do with the fact that Lightning Quant provides a CLI app built with Typer, and that CLI app calls QuantLightningTrainer as a command. Providing a CLI in Lightning Quant means that researchers can train agents from the command line by calling the app with quant run trainer or quant run fabric – we will discuss the CLI App in greater detail after covering Lightning Fabric.
Lightning Fabric
Again, Lightning Fabric is the lightweight companion to Lightning.Trainer. The heavy lifting that we have done for you in Lightning Fabric centers on device logic and distributed training. Lightning Fabric requires that we build our own training loop. This can be as simple as the implementation shown below or as complex as this example shown in how to build your own trainer.
The custom Lightning Fabric trainer used in Lightning Quant will look very similar to training loops written with PyTorch – because Fabric provides a drop-in replacement for torch.Tensor.backward as lightning.fabric.backward. Additionally, if you’ve written training loops in NumPy and implemented that loop as bespoke trainer class, the PyTorch and Lightning Fabric training loop shown below should be very familiar to you.
Fabric Trainer Pseudocode
import lightning as L
import torch
from lightning_quant.data.dataset import MarketDataset
from lightning_quant.models.mlp import MLP
def training_step(self, batch):
"""a custom training step"""
fabric = L.Fabric(
accelerator="cpu",
devices="auto",
strategy="auto",
num_nodes=1,
max_epochs=20,
precision="32-true",
loggers=None,
)
fabric.launch()
model = MLP()
optimizer = torch.optim.Adam(model.parameters(), lr=0.1)
model, optimizer = fabric.setup(model, optimizer)
dataset = MarketDataset()
dataloader = torch.utils.data.DataLoader(dataset)
dataloader = fabric.setup_dataloaders(dataloader)
model.train()
for epoch in range(20):
for batch in dataloader:
loss = training_step()
fabric.log("loss", loss)
fabric.backward(loss)
optimizer.step()
Fabric Trainer Code
import lightning as L
from lightning.fabric.loggers import TensorBoardLogger
import torch
import torch.nn.functional as F
from lightning_quant.core.metrics import regularization
class QuantFabricTrainer:
def __init__(
self,
accelerator="cpu",
devices="auto",
strategy="auto",
num_nodes=1,
max_epochs=20,
precision="32-true",
dtype="float32",
matmul_precision="medium",
) -> None:
"""A custom, minimal Lightning Fabric Trainer"""
if "32" in dtype and torch.cuda.is_available():
torch.set_float32_matmul_precision(matmul_precision)
self.fabric = L.Fabric(
accelerator=accelerator,
devices=devices,
strategy=strategy,
num_nodes=num_nodes,
precision=precision,
loggers=TensorBoardLogger(root_dir="logs"),
)
self.fabric.launch()
self._dtype = getattr(torch, dtype)
self.max_epochs = max_epochs
self.loss = None
self.dataset = None
self.model = None
def fit(
self,
model,
dataset,
l1_strength: float = 0.1,
l2_strength: float = 0.1,
) -> None:
self.dataset = dataset
self.dataloader = torch.utils.data.DataLoader(self.dataset)
self.model = model
self.optimizer = torch.optim.Adam(self.model.parameters(), lr=0.1)
self.model, self.optimizer = self.fabric.setup(self.model, self.optimizer)
self.dataloader = self.fabric.setup_dataloaders(self.dataloader)
self.model.train()
for epoch in range(self.max_epochs):
for batch in self.dataloader:
input, target = batch
input = input.to(self._dtype)
self.optimizer.zero_grad()
output = self.model(input)
criterion = F.cross_entropy(output, target.to(torch.long))
self.loss = regularization(
self.model,
criterion,
l1_strength=l1_strength,
l2_strength=l2_strength,
)
self.fabric.log("loss", self.loss)
self.fabric.backward(self.loss)
self.optimizer.step()
The example shown above is simple in that the training loop is only monitored by a sentinel for-loop that will terminate after max_epochs has been reached. Meaning the example is not monitoring for early stoppage based on a particular metric’s improvement or lack thereof – it is simply going to train for as many epochs as you’ve told it to and has no concept of convergence criteria.
What remains to be shown is how we actually go about training ElasticNetMLP or MLP with Lightning.Trainer or Lightning Fabric. We’ll cover the training process along with the CLI app implementation in the next section.
Enabling Training from the Command Line
What is a CLI? A CLI is a Command Line Interface – a terminal app like those offered in pip, conda, poetry, and git; or standard Unix tools like ls and ps. There are several ways to build CLIs with Python. One is Python standard’s argparse. Another is Click by Pallet Projects. And yet another CLI framework is Typer, built by the creator of FastAPI. I’ve opted to use Typer in Lightning Quant because it has Click and Rich under the hood – making for a familiar interface and great-looking formatting in the terminal.
Back to the topic at hand – training a PyTorch model with PyTorch Lightning or Lightning Fabric. Below we have two implementations, one for each trainer. We will cover the implementation for Lightning.Trainer first.
The Typer code has been removed from the examples in order to keep the code concise. For the full CLI, please see lightning_quant.cli.interface
Running Lightning.Trainer
Recall from above that the custom Lightning.Trainer is named QuantLightningTrainer, and the custom LightningModule is named ElasticNetMLP. You will also notice MarketDataModule in the import statements. MarketDataModule is a custom LightningDataModule that provides the PyTorch DataLoaders to QuantLightningTrainer.
from lightning_quant.core.lightning_trainer import QuantLightningTrainer
from lightning_quant.data.datamodule import MarketDataModule
from lightning_quant.models.mlp import ElasticNetMLP
model = ElasticNetMLP(in_features=6, num_classes=num_classes)
datamodule = MarketDataModule()
trainer = QuantLightningTrainer(
devices=devices or "auto",
accelerator=accelerator,
strategy=strategy,
fast_dev_run=fast_dev_run,
precision=precision,
max_epochs=max_epochs,
callbacks=[EarlyStopping("training_loss")],
)
trainer.fit(model=model, datamodule=datamodule)
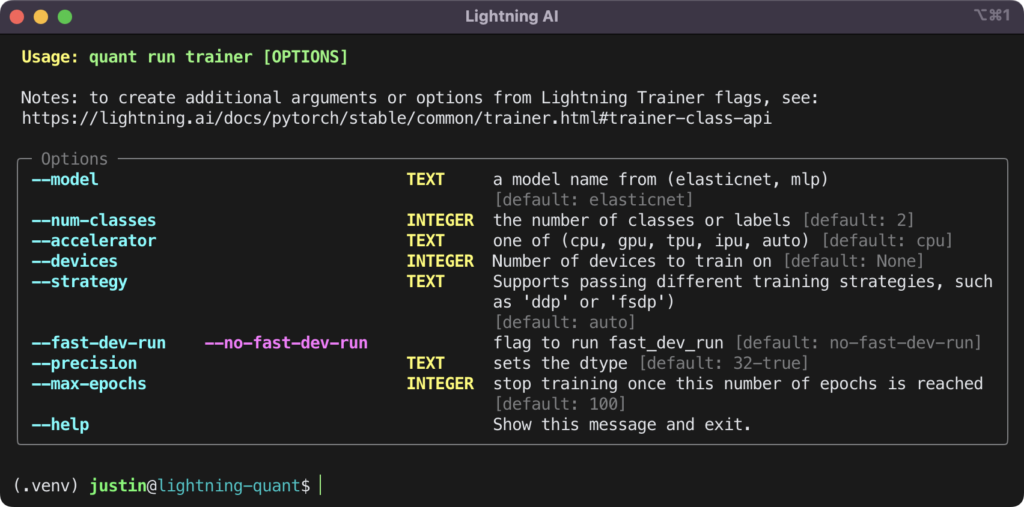
The above code is executed in Lightning Quant by calling quant run trainer from the command line. The trainer command is configured to receive several options that can be passed to QuantLightningTrainer. Those additional options are pictured below.
Running the Lightning Fabric Trainer
Using the quant CLI to run the Lightning Fabric trainer is accomplished in the same manner as running the Lightning.Trainer. To do so, simply call quant run fabric from the command line to run the code shown below.
from lightning_quant.data.dataset import MarketDataset
from lightning_quant.core.fabric_trainer import QuantFabricTrainer
from lightning_quant.models.mlp import MLP
model = MLP(in_features=6, num_classes=num_classes)
dataset = MarketDataset()
trainer = QuantFabricTrainer(
accelerator=accelerator,
devices=devices,
strategy=strategy,
num_nodes=num_nodes,
max_epochs=max_epochs,
precision=precision,
)
trainer.fit(model, dataset)
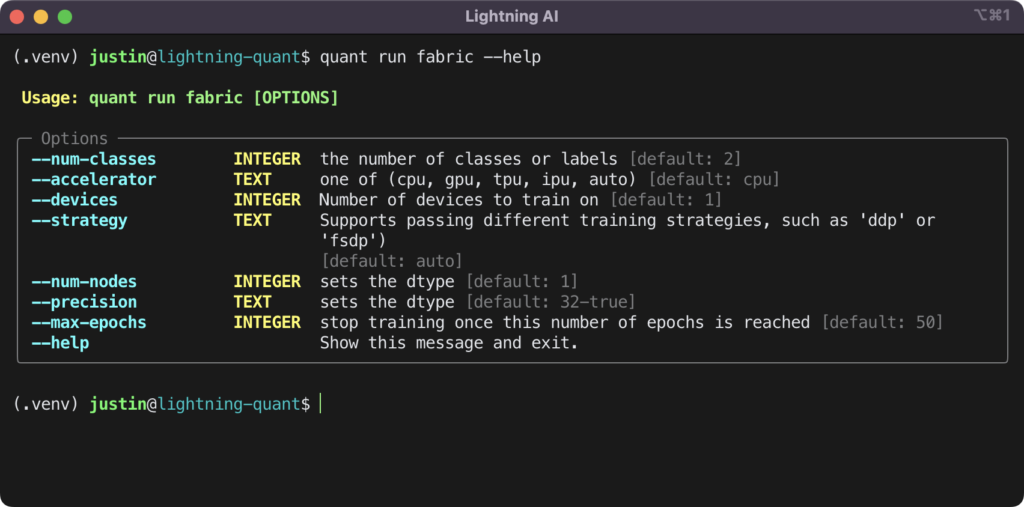
In the example above, you may notice that MarketDataset is imported instead of MarketDataModule. This is because QuantFabricTrainer accepts MarketDataset as the dataset argument in the .fit method and then passes the dataset to a PyTorch DataLoader. Just as the trainer command is configured to receive several options that can be passed to QuantLightningTrainer, fabric can also accept additional options to pass to QuantFabricTrainer. The additional options for fabric are pictured below.
An Example of Using the CLI to Run a Training Session
Below is a quick video of using quant run fabric in a CUDA-enabled environment.
The CLI can configure QuantFabricTrainer to run on a CUDA device or devices by setting the --accelerator flag to either cuda or gpu and Lightning Fabric will enable the appropriate backend settings for your combination of accelerator and precision. An example of this is – Lightning Fabric may check for NVIDIA Ampere Tensor cores before setting MATMUL precision. Meaning that while Fabric is lightweight, it is still accomplishing tasks for you that allow for a variety of system configurations without having to write the code on your own.
Conclusion
In this article, we learned how Lightning is both PyTorch Lightning and Lightning Fabric, and how these combined frameworks enable researchers with maximal flexibility and minimal boilerplate around raw PyTorch code. You can find the code and data used to create the examples shown above on GitHub at Lightning Quant.
Join the Community
Lightning AI is proud to be open-source and hosts a large community of engineers in our Discord. Join us and be a part of the open-source effort to drive the world forward with artificial intelligence and Lightning!
