Takeaways
You’ll learn to use PyTorch Lightning’s Core API features by completing an applied project to train a Language Transformer written in PyTorch on the WikiText2 dataset.
The code in this tutorial is available on GitHub in the text-lab repo. Clone the repo and follow along!
Introduction
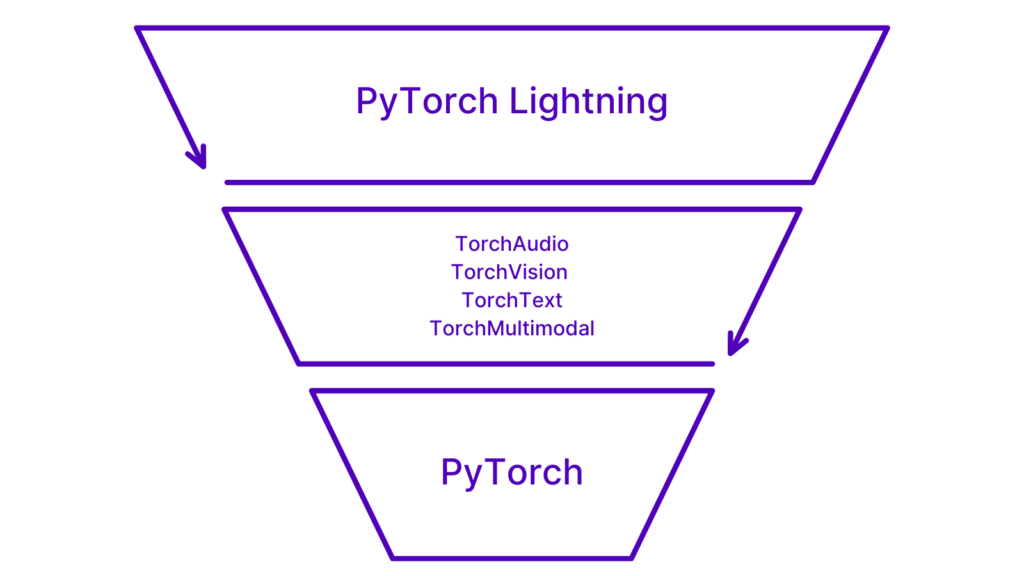
Training deep learning models at scale is an incredibly interesting and complex task. Reproducibility for projects is key, and reproducible code bases are exactly what we get when we leverage PyTorch Lightning for training and finetuning. An added benefit of using PyTorch Lightning is that the framework is domain agnostic and is complementary to PyTorch. Meaning – it does not replace PyTorch and we are enabled to train text, vision, audio, and multimodal models using the same framework – PyTorch Lightning.
The Research
Our research objective for this tutorial is to train a small language model using a Transformer on the WikiText2 dataset. Both the Transformer and the dataset are available to us in PyTorch Lightning at pytorch_lightning.demos.transformer. We’ll see later how we can pull those into our Python module or Jupyter Notebook for use in our custom LightningDataModule and LightningModule.
PyTorch and PyTorch Lightning
PyTorch Lightning is not a replacement for PyTorch. Rather, PyTorch Lightning is an extension – a framework used to train models that have been implemented with PyTorch. This relationship is visualized in the following snippet.
import pytorch_lightning as pl
class LabModule(pl.LightningModule):
def __init__(self, vocab_size: int = 33278):
super().__init__()
self.model = Transformer(vocab_size=vocab_size)When we create self.model as shown above, we often refer to self.model as the internal module. Let’s keep reading to learn how to apply this interoperability between PyTorch and PyTorch Lightning!
PyTorch Lightning: The Core API
Okay – time to get to it! In the next sections, we will cover how to use the Core API of PyTorch Lightning. What is the Core API? First, let’s consider how we might organize the training steps of any deep learning project sequentially according to data processing, creating a model, and then training that model on the given dataset.
These key steps/attributes are exactly how the Core API is structured with LightningDataModule, LightningModule, and Trainer.
LightningDataModule
LightningDataModule (LDM) wraps the data phase. It takes in a custom PyTorch Dataset and DataLoader which enables Trainer to handle data during training. If needed, LDM exposes the setup and prepare_data hooks in case you need additional customization. For the training phase, the PyTorch DataLoader has to be defined as train_dataloader and val_dataloader. The following code snippet is pseudocode (an example) of how to import LightningDataModule and use it to create a custom class.
import pytorch_lightning as pl
class LabDataModule(pl.LightningDataModule):
def __init__(self):
super().__init__()We will see examples of creating train_dataloader and val_dataloader methods in LDM later in this tutorial.
LightningModule
LightningModule is the main training interface with the previously mentioned PyTorch models referred to as ‘internal modules’. LightningModule itself is a custom torch.nn.Module that is extended with dozens of additional hooks like on_fit_start and on_fit_end. These hooks allow us better control of Trainer’s flows and enables custom behaviors by overriding these hooks. The following snippet of pseudo-code shows how to import and use LightningModule to create a custom class.
import pytorch_lightning as pl
class LabModule(pl.LightningModule):
def __init__(self):
super().__init__()Trainer
Trainer configures the training scope and manages the training loop with LightningModule and LightningDataModule. The simplest Trainer configuration is accomplished by setting flags like devices, accelerator, and strategy and by passing in our choice of loggers, profilers, callbacks, and plugins.
import pytorch_lightning as pl
# instantiate the trainer
trainer = pl.Trainer()
# instantiate the datamodule
datamodule = LabDataModule()
# instantiate the model
model = LabModule()
# call fit to start training
trainer.fit(model=model, datamodule=datamodule) Rather see this explained in a video? Sebastian Raschka, our Lead AI Educator, breaks down how to get started with structuring our PyTorch Code using PyTorch Lightning.
Getting Started: Hands-on Coding
Installing PyTorch Lightning
First, we will need to install PyTorch Lightning. We can further understand how closely integrated PyTorch Lightning is with PyTorch during the installation process. How? Simply by calling out that using the following command in the terminal to install PyTorch Lightning also installs PyTorch into our virtual environment. So let’s go ahead and install PyTorch Lightning using the following command.
pip install pytorch-lightningWe also need to install TorchText in order to run the demo. Let’s also do that by using the following command in the terminal.
pip install torchtextDo you need help creating a virtual environment? There’s a video for that too!
The Custom LightningDataModule
The dataset we will use is WikiText2. The demo code available to us in PyTorch Lightning will automatically fetch WikiText2 for us – so there’s no need to worry about downloading the dataset from torchtext.
In the example below, WikiText2 is imported as LabDataset. If you wish to do so, you can check out the code used to create the custom PyTorch Dataset in textlab.pipeline.dataset.py. However, for the purposes of this tutorial, we can ignore that implementation for now. Once again, here’s the pseudo-code for creating a LightningDataModule without adding any additional customization.
import pytorch_lightning as pl
class LabDataModule(pl.LightningDataModule):
def __init__(self):
super().__init__()Creating the Custom Class
Compared to the pseudo code example, we need to customize the __init__ method further in order to enable random splitting of the dataset, and let the LightningDataModule know the data source. This is where we can also provide domain-specific arguments like block_size for datasets used in text problems, or image_size for vision problems.
In the code blocks below we will use a custom extension for this project which inherits the PL basic classes for LightningDataModule. This custom class will be called LabDataModule.
from pathlib import Path
from torch.utils.data import DataLoader, random_split
import pytorch_lightning as pl
from textlab import Config
from textlab.pipeline import LabDataset
class LabDataModule(pl.LightningDataModule):
def __init__(
self,
num_workers: int = 2,
data_dir: Path ="data",
block_size: int = 35,
download: bool = True,
train_size: float = 0.8,
):
super().__init__()
self.data_dir = data_dir
self.block_size = block_size
self.download = download
self.num_workers = num_workers
self.train_size = train_size
self.dataset = NonePreparing the Data
The prepare_data method will be called first by Trainer. When this happens, the dataset will either download or be fetched automatically from the data directory cache. In particular, this is important for multi-node training when each node needs to have its own copy for the training dataset.
def prepare_data(self):
self.dataset = LabDataset(
data_dir=self.data_dir,
block_size=self.block_size,
download=self.download
)
Setting Up the Data Splits
The setup method is used by Trainer while setting up the training process on each used device/GPU. In this hook, we need to create the train_data, val_data, and test_data splits for the entire dataset and refer to them as attributes of LabDataModule (these splits will be later passed to the Dataloaders).
def setup(self, stage: str):
if stage == "fit" or stage is None:
train_size = int(len(self.dataset) * self.train_size)
test_size = len(self.dataset) - train_size
self.train_data, self.val_data = random_split(self.dataset, lengths=[train_size, test_size])
if stage == "test" or stage is None:
self.test_data = self.val_dataThe Train, Validation, and Test DataLoaders
As implied above, Trainer does not access train_data, val_data, or test_data directly, but instead, needs to be fed by batching data with PyTorch DataLoaders.
def train_dataloader(self):
return DataLoader(self.train_data, num_workers=self.num_workers)
def val_dataloader(self):
return DataLoader(self.val_data, num_workers=self.num_workers)
def test_dataloader(self):
return DataLoader(self.test_data, num_workers=self.num_workers)Now that we have handled our data phase by creating LabDataModule, let’s move onto our model phase by creating a custom LightingModule around our Transformer internal module.
Need a video break? Here’s an awesome summary by Sebastian on Organizing Your Data Loaders with Data Modules.
The Custom LightningModule
Creating the Language Model with PyTorch
The demo Transformer from PyTorch Lightning is implemented with PyTorch. The details of the implementation are outside of the scope of this post. For now, let’s just remember the previously discussed concept of torch.nn.Modules as internal modules that will be used in LightningModules as self.model.
Curious about what the Transformer implementation looks like? You can check it out on GitHub!
Creating the Custom Class
Just as we further customized LabDataModule, we also need to customize our LightningModule in the class shown below. This new class, LabModule, is our custom LightningModule that will interface with Trainer and train the internal module with the hooks that we cover in the next few sections.
Below we can see that we have added forward and training_step in addition to __init__. The forward method calls the internal module and will cause the Transformer to go through its training process using what we refer to as autograd in the PyTorch world. Autograd is beyond the scope of this post. However, if you’d like to learn more – you can read this Gentle Introduction to torch.autograd by the PyTorch team.
class LabModule(pl.LightningModule):
def __init__(self, vocab_size: int = 33278):
super().__init__()
self.model = Transformer(vocab_size=vocab_size)
def forward(self, inputs, target):
return self.model(inputs, target)
def training_step(self, batch, batch_idx):
inputs, target = batch
output = self(inputs, target)
loss = torch.nn.functional.nll_loss(output, target.view(-1))
return lossThe training_step Method
The primary interaction between a LightningModule and Trainer happens via the training_step method of the LightningModule. This method will call the internal module and calculate a loss function needed for model optimization. In particular, the method sources batched inputs, passes the batch to the model, and collects an output/response. Then, it calculates and returns the loss that will be used by Trainer to update the gradients.
def training_step(self, batch, batch_idx):
inputs, target = batch
output = self(inputs, target)
loss = torch.nn.functional.nll_loss(output, target.view(-1))
self.log("training-loss", loss)
return lossThe validation_step and test_step Methods
These validation and test methods are similar to training_step except that no loss is returned. And, if we were to use the EarlyStopping callback in the validation_step, we’d monitor the loss that is calculated during the validation_step to stop training if no improvement is observed.
def validation_step(self, batch, batch_idx):
inputs, target = batch
output = self(inputs, target)
loss = torch.nn.functional.nll_loss(output, target.view(-1))
self.log("val-loss", loss)
def test_step(self, batch, batch_idx):
inputs, target = batch
output = self(inputs, target)
loss = torch.nn.functional.nll_loss(output, target.view(-1))
self.log("test-loss", loss)Curious about EarlyStopping? Check out this video by our founder, Will Falcon to learn more!
The configure_optimizers Method
PyTorch Lightning provides two main modes for managing the optimization process: manual and automatic. For the majority of research cases, automatic optimization will do the right thing for you and it is what most users should use, and we will be using automatic optimization with configure_optimizers as shown below.
def configure_optimizers(self):
return torch.optim.SGD(self.model.parameters(), lr=0.1)Using Trainer
Okay – let’s talk a little bit more about Trainer, the star of the show. Several years have gone into developing PyTorch Lightning, and especially Trainer and all that lies under the hood – like its ability to configure the environment as mentioned in the introduction.
We’ll take the code snippet for Trainer that was used in the introduction and modify it in a way that allows us to understand how to configure the environment and then conduct a training run.
Configuring Trainer with Flags
We can configure our environment when we first instantiate the Trainer object. This is done with flags like devices, accelerator, and strategy and by passing in our choice of loggers, profilers, and callbacks.
import pytorch_lightning as pl
from pytorch_lightning.callbacks import EarlyStopping
from pytorch_lightning.loggers.wandb import WandbLogger
from pytorch_lightning.profilers import PyTorchProfiler
trainer = pl.Trainer(
devices="auto",
accelerator="auto",
strategy="auto",
precision="32-true",
enable_checkpointing=True,
callbacks=EarlyStopping(monitor="val-loss", mode="min"),
logger=WandbLogger(name="textlab-demo", save_dir="logs/wandb"),
profiler=PyTorchProfiler(dirpath="logs/torch_profiler"),
)Aside from these additional features, you will also notice that we have set devices, accelerator, strategy, precision, and enable_checkpointing. Additional context for each is provided below:
accelerator: supports passing different accelerator types (“cpu”, “gpu”, “tpu”, “ipu”, “auto”) as well as custom accelerator instances.devices: number of devices to train on (int), which devices to train on (list or str), or “auto”strategy: supports passing different training strategies with aliases (“ddp”, “fsdp”, etc) as well as configured strategies.precision: check out this video by Will on precision.enable_checkpointing: saves a checkpoint for you in your current working directory, with the state of your last training epoch.
In the snippet shown above, we are also enabling our trainer session with additional features like EarlyStopping, WandbLogger, and PyTorchProfiler.
Why is using PyTorchProfiler handy? Because it allows us to find bottlenecks in our training loop. If you’re interested in learning more – here’s our official documentation on the topic.
Why use WanbdLogger? Because it will allow us to visualize and compare our experiments with interactive graphs and tables on the Weights and Biases platform.
Training the Model
Now that we have passed in our appropriate flags, callbacks, and support plugins, we are ready to train the model! We can start the training with the three easy lines shown below.
# instantiate the datamodule
datamodule = LabDataModule()
# instantiate the model
model = LabModule()
# call .fit
trainer.fit(model=model, datamodule=datamodule) If you’ve cloned and installed the demo repo, text-lab, then you can test out what we’ve done above with one of the following commands in the terminal.
To run Trainer in fast-dev-run mode, use this command:
lab run dev-runOtherwise, you can test a full demo run and log it with CSVLogger with:
lab run demo-runAnd if you have a Weights and Biases account, you can log your run with:
lab run demo-run --logger wandbGreat Work!
Above we learned how to organize our PyTorch code into a LightningDataModule, LightningModule, and to automate everything else with Trainer. By doing so, we trained a language Transformer on the WikiText2 dataset and even saw how we could create custom classes by implementing inheritance in Python interfaces (class objects). We also used a custom CLI built with Typer.
Conclusion
Research and production code can quickly grow from simple modules to feature-rich packages as technical needs like distributed training and quantization arise. PyTorch Lightning has implemented these features for you. Making those features abstracted from the code you care about most – the research code focused on training your model.
By using PyTorch Lightning you inherit well tested features, which translates to faster prototyping thanks to fewer bugs and faster iterations. You also inherit code written for researchers by researchers. PyTorch Lightning’s contributors are individuals in their Ph.D. candidacy or they are working as research scientists or research engineers at leading AI labs.
PyTorch Lightning structures our code into four cohesive segments: data code, engineering code, research code, and support code (loggers, profilers). Compartmentalization according to task helps us to organize our code base, increasing readability and reusability. In turn, this creates a more maintainable code base that is suitable across the spectrum of beginners and experts.
Remember – PyTorch Lightning is also not a replacement framework for PyTorch. Instead, it is a philosophy and methodology of organizing your PyTorch code to create reproducible state of the art research at scale – with ease.
Resources
Official Documentation
Code
Still have questions?
We have an amazing community and team of core engineers ready to answer questions you might have about PyTorch Lightning and the rest of the Lightning ecosystem. So, join us on Discourse or Discord. See you there!